How to photograph yer Pickelhaubes (or anything else)

Tony without Kaiser

Departed
Staff member
I have received many compliments on my photography which is very much appreciated, but Chas and R1 are of a similar quality, and Brain's last photos were quite good I noticed. But we all use different methods.

So, I'll illustrate here how I take my photos. Here are three photos of the same helmet, a lovely little Model 1895 Württemberg Train Abteilung 13 Mannschaften Reserve Pickelhaube. (Did anyone think I would use an officer helmet?)

Beyond adding text and re-sizing the photos, I did absolutely no alteration to the photos.

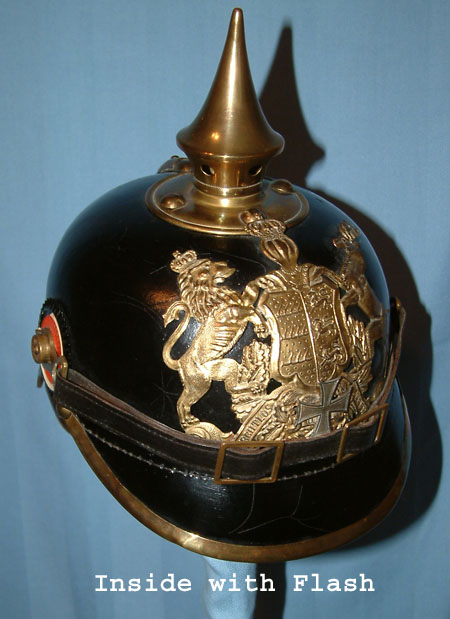
First, below, is what is commonly seen; a helmet taken inside with a flash. You can obtain better quality than this, but the problems are clear. Inadequate and poorly distributed lighting, shadow, glare from the flash,
and fine details "blown away" by the flash.

photographing3.jpg


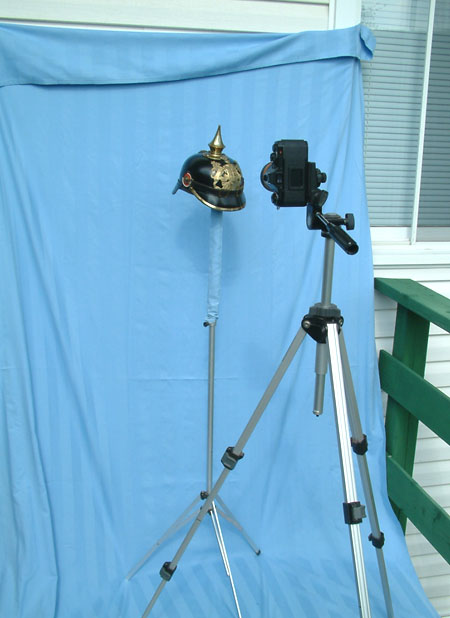
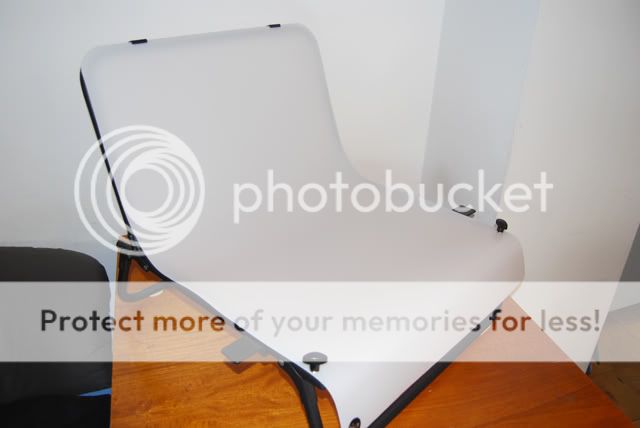
Now I set up my "studio" outside which is a blue bed cover that you will see in all the photos on Kaiser's Bunker, cleverly clipped to the siding of my house on the deck outside. The helmet is suspended about 30 cm (1 foot) from the wall on a stand.

photographing4.jpg


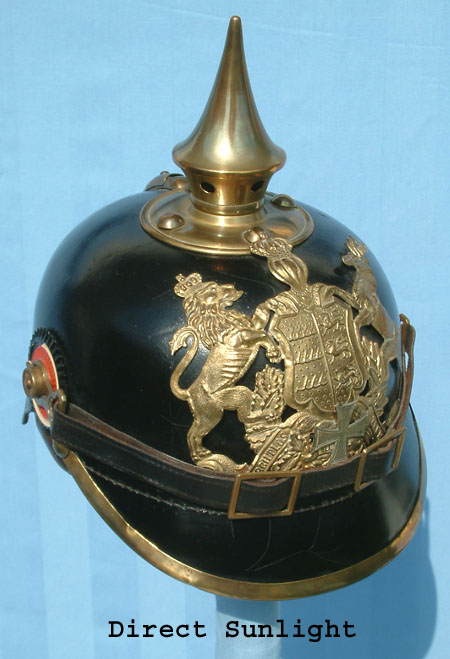
The example below is taken outside but in direct sunlight. Not as horrible as the inside photo, but still a lot of glare and shadow.

photographing2.jpg


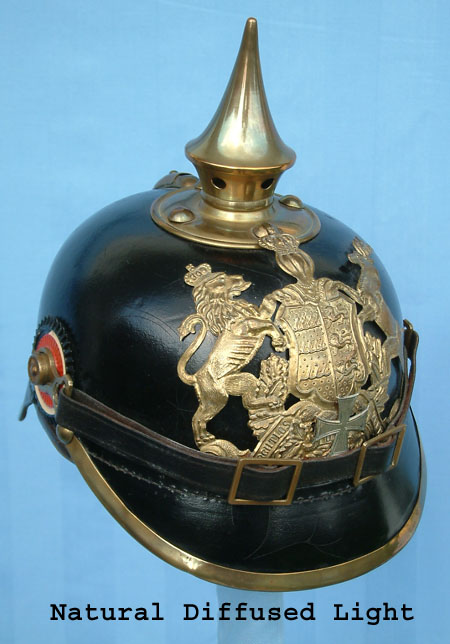
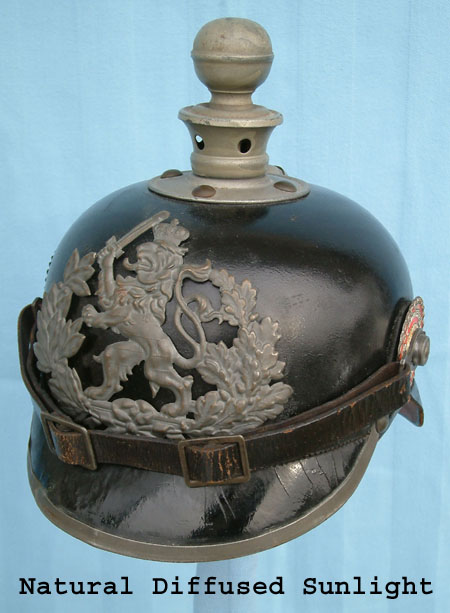
The photo below is what I aim for. A bright, yet overcast day. The sunlight is diffused and well distributed. There is no shadow and the details of the helmet are easy to see. I have been known to shovel a meter of snow off the deck in -25 to take a quick photo before freezing myself, the camera, and the helmet.

photographing1.jpg


Yes its a pain in the butt to take them outside, especially when I am humping mannequins up two flights of stars and outside to get a tunic shot, but the quality speaks for itself.

Now over to Chas and his tent results. Hopefully R1 will chip in here as well with his suggestions and a few examples.
 
As Tony has demonstrated above, natural diffused light produces the best color accuracy, contrast, and depth of field. Lately, I've been experimenting with a light tent designed specifically for digital photography. The tent limits the size of the subject, but eliminates the need for bright overcast conditions to provide diffused light. My only complaint regarding the tent is that shiny obects reflect the proscenium of the opening and the interior of the tent itself.

KICX0750.jpg


When I'm in a rush, I use an interior light table with spot and key lights. This approach is similar to the technique used by Brian. Though suited to some subjects...

PICT0670.jpg


...it leaves much to be desired with others:

KICX0779-copy.jpg


This is the same helmet photographed in the tent. Look for the photographer. He is wearing white tee shirt and khaki shorts.

KICX0782-copy.jpg


Different color sweeps are available for the tent, and I have been using black. The sweep allows for some interesting and seamless photomerge possibilities; like this essay of a Baden M15 officer helmet.

lightforum.jpg


Medals are the worst. With incandescent or flash lighting, the subject must be photographed at an unsuitable angle to minimize blooming.

PICT0685.jpg


Now, the same subject photographed in the tent:

PICT0127.jpg


Finally, a merge of the two images revealing just how dramatic the differences are.

mcmerge.jpg


And, just to prove all that glitters is not gold, this is a Württemburg M15 photograhed in the tent.

KICX0765.jpg


Over to R1 or Brian.

Chas.
 
And another open-air Feldgrau against a light background to compare to Chas's black background above. This example is of course, marked to Hessen Field Artillery Regt Nr. 25

photographing5.jpg
 
Natural light is also my preferred method. I generally photograph items no more than 15 or 16 inches in height so I use a slightly different background system than Tony. For helmets I use white foam core poster board that is available in 20 inch X 30 inch sheets at most office supply stores. One sheet is placed on a horizontal surface and the other placed vertically as a background. One of the chairs on my patio works very nicely, one poster board on the seat and the other leaned against the chair back. The helmet (on a stand) is placed on the poster board so it is about 12 inches in front of the vertical board. An advantage to using the chair is I can rotate it to get the best position for the existing light. If shadows are present it is often possible to move the helmet futher away from the vertical board and rotate the chair to move the shadow away from the subject. Any shadow can then be cropped from the image.
The following helmet was photographed using the above method with some "photo shopping" of the background. The close-ups of the markings were done later on a copy stand and cut & pasted into the image.

usbssr1.jpg


Since the weather does not always cooperate when I want to take photos I also use the above poster boards inside with #1 photo flood lights. Very good results can also be achieved indoors. A key to using digital cameras with artificial light is proper setting of the white balance for the type of light. On my camera (Olympus E20N) I can bypass the built in settings and manually set the white balance directly from the background.

I also have a light tent similar to the one Chas has shown and have been experimenting with it for a couple of months. The digital tents definitely come in handy, however, it takes some practice to get good results. These tents are primarily designed to be used indoors with artificial light placed outside the tent. They do work quite well outdoors with existing light. The tents are designed to allow light to pass into the unit from all sides. This can be a problem when using the black sweep as the diffused light entering through the back of the tent tends to "blow through" the sweep creating a hot spot. I found that placing poster board behind the back of the unit solves this problem and greatly improves the image. The following image was taken outdoors as described with the black sweep.

ncoboutsiderp0.jpg


The following image was taken(outdoors) in the light tent with a white sweep and poster board behind the unit.

ncowoutsidevy3.jpg


The following is the same image after "photo shopping".

ncowoutsidepsyo9.jpg


When photographing small items such as medals and belt buckles I only use a copy stand with photo flood lights and the camera set in macro mode. Here are a couple of examples. The backgrounds have been cleaned up in Photo Shop.

redeagleii3.jpg


ir91pn4.jpg


And now it is Brian's turn.

Reservist1
 
I will be picking up my "Ligthouse" from UPS tomorrow. If one does not want to shell out the money for an LH you can try this method suggested to me by Roger who is a CEF collector friend of both Tony and myself. Go to your local art store supplier and by some "velum" paper to act as diffusers for your lights. This will soften your lighting when shooting and avoid glare.
I have also been using one of those 3 sided white foam core display boards that you buy when your kid has a school project. However, I have been getting too much shadow because I could not get my subject far enough away from this back board. So that is something else to consider. I believe that Tony said that his backgound was 1 foot away from the subject.
When using a white backgound which is what I try to do, as R1 states, you have to set the "white balance" of your digital camera. I have been using 2, 75watt Halogen lights screwed into clamp fittings and fastened one on either side of the board. My camera is a Canon Power Shot S30 almost always on a tripod.
One thing that Tony forgot to mention was that his back deck ( I believe) faces South consequently, even on a cloudy day, he is getting the max natural light available. My back deck faces North so it is a poor alternative. I live in a 2 story house facing South with double car garage on the front. Consequenly, to gain the advantage of the South light on a cloudy day I would be taking pictures in my drive way....NOT!! Thus, I must master the art of inside photography. However, as yet, I am no photographer.....both R1, T and Chas are far more expert than I. Brian
 
These are some very helpfull lessons and both James and I thank you for this information. I think my brother "Who is holding most of my helmets for safe keeping" has purchased one of those light houses for his studio or he might have really bought a lighthouse.

Again thanks but I have to admit that this does bother me just a bit. "humping mannequins"
 
Another alternative is a shooting table. This looks like a lawn chair, but it is actually a special table for shooting items.

table1.jpg


I've been happy with the results. I live in a high-ris building in New York City, so I've had interesting conversations as I bring sun helmets, a busby and various steel helmets up on the roof deck to photograph. I try to aim for natural light as well.

I've also used the shooting table in my apartment, but that requires catching the light at just the right time of the day... and that changes depending on the time of year.

This helmet was taken outside, there is a bit of shadow but not too much.

french_m31c_big1.jpg


And this was reasonable too:
british_lancer_big1.jpg
 
Hello: My last nine years in the US Yacht Club (Navy) was as a Medical/Forensic photographer. Left the field after everything went digital and it was no longer the technical art form it used to be. Doing tabletop product type photography I used to have a 'fill' flash about 12ft from the subject and the main flash was on a low setting. I prefer to keep the subject as far from the background as possible as it eliminates shadows. The fill flash was on a remote slave trigger and I kept the camera on the same plane as the subject.

White Sweeps are great and you can place colored gels over the fill flash to give a hint of colour to the white background.

Unfortunately my expertise is working with film and filters and I still haven't mastered digital photography past the point'n shoot stage.

All the images look great incidentally and I also agree that daylight (5200K) here in Maryland is the best light source.

Have a good weekend all.

Bill
 
Hi

Highly convinced by the examples above, I tried and it...worked !

So for those who want to have another tips, please read: http://www.terraculturae.com/rubrique,bien-photographier,1200453.html
 
The title of this thread ".... (or anything else)" is absolutely right. I used to photograph a lot of military vehicles and was always glad for a lightly overcast day, or better still light overcast with some humidity to act as a natural 'bounce' for the light. Direct sun was always harsh.

Nice helmets and set-ups guys!

:D Ron
 
Back
Top