
You are using an out of date browser. It may not display this or other websites correctly.
You should upgrade or use an alternative browser.
You should upgrade or use an alternative browser.
First attempt at a helmet restoration
- Thread starter Steve Nick
- Start date
Steve Nick
Well-known member
Louis:Personally, I would leave it. they are expensive and hard to fix. However, I think it is very doable if you are super careful as to not tear the leather. But I don't know how you would give it the original black colour
You're certainly right about the cost of a replacement original strap.
I have a bit of experience with leather working as I've repaired my hockey goalie equipment over the years. It's possible to dye the leather but the leather grain at this point is not as dense as it was so it may penetrate both sides of the leather. Shoe polish could work but you'd have to be very careful and long term it may further damage the leather.
Probably best to not push my luck I think.
pickelhauben
Well-known member
Hey Steve annealing is the way to go.
You don't have to heat the whole thing up just about 1/2 inch past the flared area.
I am not sure if you have done this before but it is quite easy.
I find using MAP gas ( sourced from any hardware store) works easier than standard propane.
Heat it up until it changes color then quinch in water .
It should be malleable enough to bend by hand.
I have had irons made for rebinding the curve in the rear spine but this can be done with wood if you have any wood working skills.
Simply make a divot in a 2x4 the same width of the spine a little longer and a little deeper.
Using an approx. 1/2 inch wooded dowl made the exact shape on the curved channel and tap tap until you get the shape you want.
You may have to bend my hand then tap in the rounded channel shape several times to get the shape you want.
Then polish out .
Steve Nick
Well-known member
Matthew:
Thanks for the interest and your comments.
I do have soldering skills and wood working skills. I have lots of appropriate sized hard wood around that I can use to make a form as a pattern for the re-bending. This I think would be the reverse of your method as I would be forming the spine around a form.
If I understand you correctly you are using the "divot" as a means of maintaining the curved channel shape as you tap the spine into the correct shape? This would have the benefit of not potentially marring the exterior finish of the spine?
coert65
Well-known member
I think Matthew means by a divot, a thing that we here in europe call a dowel, a wooden piece, shaped exactly to the form of the inside profile of the rear spine. So, bending it, and then using the dowel in a profile which matches the outer shape of the spine, would ensure the correct outer, and inner shape out the spine.
But then again, I can be wrong.
Regards, Coert.
But then again, I can be wrong.
Regards, Coert.
pickelhauben
Well-known member
Both of you are right if you shape the punching dowel with no sharp edges it can be used to tap in the rounded shape to match the skull shape.
A little at a time and don’t drive it like your trying to shape a horseshoe!
My divot would be carved in the wood to emulate the shape of the curve one way and the rounded cross section of the trim channel the other.
Once the metal is softened it should move with ease
A little at a time and don’t drive it like your trying to shape a horseshoe!
My divot would be carved in the wood to emulate the shape of the curve one way and the rounded cross section of the trim channel the other.
Once the metal is softened it should move with ease
Last edited by a moderator:
DoneDoing
Member
Hi Steve
Great job with the chinstrap.
I've also had a lot of experience with repairing leather.
Re-coloring that wouldn't be difficult at all but I'd recommend the kiwi polish liquid dye as it has more synthetic qualities.
The join you completed so well can be rubbed down gently with sandpaper and refilled with any of the dust that comes off from sanding.
Steve Nick
Well-known member
Thanks to everyone who has taken an interest in this project. I appreciate the thoughtful advice.
Steve Nick
Well-known member
In case you thought I’d given up on the Pickelhaube restoration project, I haven’t; it’s just been a long process. The lacquer has now been restored through the tedious process of applying a layer then waiting 24 hours for it to harden before sanding it with 600 grit sandpaper and water.
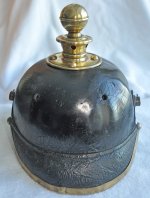
I’ve finally completed the lacquer work and the helmet is ready to have the hardware reinstalled. For these pictures I had the Kugel and base plate ready to install but the rear spine, which is secured at the top by the rearmost dome stud, has to be re-shaped to fit correctly, so, for these photos I’ve left it semi-installed. It has cleaned up quite well when compared to the original condition.
The rear spine will have to be annealed in order to bend it to a shape that will follow the shape of the shell. Of course applying that amount of heat will melt the solder securing the prongs mounted to the interior of the rear spine so, these will have to re-soldered after the spine has been annealed. Then it’s just a matter of installing the spine, the Wappen, final fitting and securing of the Kugel base plate, mounting the Kokarden and fitting the repaired original chinstrap.
I made a decision to leave the helmet crazing intact for the most part. In the restored areas the lacquer finish is like new, but to remove the crazing the entire shell would have to be re-lacquered and I wanted to leave the finish as original as possible.
The end is in sight!
Attachments


Hi Steve,
Looks great!
I really like your approach of conserving as much as possible of the original finish, and only repairing where required. In this way it is also visible afterwards where repairs have been made, which imo adds to the authenticity of the helmet.
Regards,
Lars
Looks great!
I really like your approach of conserving as much as possible of the original finish, and only repairing where required. In this way it is also visible afterwards where repairs have been made, which imo adds to the authenticity of the helmet.
Regards,
Lars

")
Steve Nick
Well-known member
Thanks for your comments gentlemen. Good to hear some positive reactions.
Brian: You're right it's a tedious process, but it's satisfying knnowing that you've been able to give a new lease on life to a helmet that was pretty much a write off.
Brian: You're right it's a tedious process, but it's satisfying knnowing that you've been able to give a new lease on life to a helmet that was pretty much a write off.
Steve Nick
Well-known member
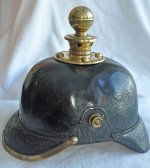
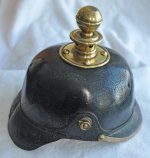
Well, here is the finished product.
As mentioned earlier, I used the Oldenburg Wappen and NCO Kokarden from my “contrived” M95 Oldenburg Artillery helmet and used the parts to complete this M91 Artillery helmet as worn by an NCO of the 2nd and 3rd Batteries of the 62nd East Frisian Artillery Regiment.
The rear spine required annealing in order to bend it to a radius that comes close to fitting the shell which has undoubtedly shrunk somewhat over the past 130 years. This resulted in the attachment prong which secures the spine to the shell coming unsoldered. I had to use “solder wick” to remove most of the original solder which was heavily oxidized and then re-solder it to the brass spine.
The spine prongs had considerable pressure on them in order to get the spine to fit as close as possible to the shell. I decided a tin washer would be required (most helmets used them but it was missing on this helmet) to prevent the prong from tearing through the leather shell. These tin washers are very hard to find so I had to make my own from a tin can and then file it into an acceptable circular shape by hand.
I think for a first try, it turned out rather well.
Steve Nick
Well-known member
Thanks for the positive comments gentlemen. Nice to read.
I've showed this project to several non-collector types and I get polite comments but you can tell that in their heads they're thinking "Why. Who cares?".
I've showed this project to several non-collector types and I get polite comments but you can tell that in their heads they're thinking "Why. Who cares?".