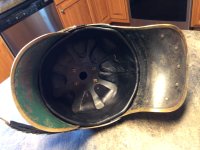
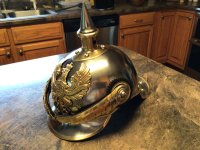
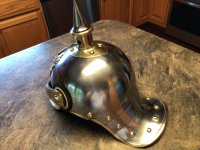
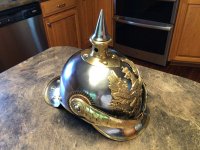
I prefer original patina helmets, but sometimes you just need to do a full restoration. I purchased this m89 kuirassier a month ago on eBay. There was brief discussion about it here on the forum under eBay threads. It was painted black and missing the liner and several chin scales. I made a liner and rebuilt the scales, replacing missing ones. After paint stripper, there was mild spidering in the metal which had to be sanded out. I started with 150 Emory cloth, then 220 paper, 340 paper, 400 paper, 600 paper, and finally 1500 paper. I spent 2 hours per grit all sanded by hand. There was no buffing done; what you see was the 1500 grit. These helmets have a high nickel content steel that shines well when smooth. I have just over 20 hours in the restoration. Ron

You are using an out of date browser. It may not display this or other websites correctly.
You should upgrade or use an alternative browser.
You should upgrade or use an alternative browser.
Kuirassier Restoration
- Thread starter Rkinkade
- Start date
Pontiac9999
Well-known member
Outstanding!! Beautifully done!

I have buffed other helmets in the past using a wheel and various compounds, and I didn’t see much additional improvement. Also, the brass trim edges and rivets round off because they are much softer than the steel body. The m15 kuirassier ones that I buffed did not shine as well as this m89. I suspect it is the nickel content difference.Very nice job. Are you planning on buffing it? In my useless opinion, you've gone this far, I would go the next step
John Josef
Well-known member
What a transformation!
Congratulations I wouldn't have even attempted it, but it was a worthwhile endeavor.")
Congratulations I wouldn't have even attempted it, but it was a worthwhile endeavor.
Thank you all for your kind words. This is the 5th kuirassier I have done a complete restoration on, and I always tell myself, “this is the last one!”. In the end, the hard work is worth the effort. It doesn’t seem so in the middle of the work. Hmmmm, I have an 1860 kuirassier sitting in the closet that needs some love.
Ron
Ron
ww1czechlegion
Well-known member
Congratulations Ron, on a fine restoration job!
Best Wishes,
Alan
Best Wishes,
Alan
Pontrest
Active member
Ron, I have tried my hand at restoring some of my M1915 JzP and Kurassier helmets, but have stopped short of getting them to shine like this, resulting in a more aged look. I may rethink the sanding piece specifically, as you have spent way more time sanding than I have. I also find myself adding a subdued grey paint to the steel trim on my helmets when the original paint is worn off, to replace the original grey oxide paint that was present.I prefer original patina helmets, but sometimes you just need to do a full restoration. I purchased this m89 kuirassier a month ago on eBay. There was brief discussion about it here on the forum under eBay threads. It was painted black and missing the liner and several chin scales. I made a liner and rebuilt the scales, replacing missing ones. After paint stripper, there was mild spidering in the metal which had to be sanded out. I started with 150 Emory cloth, then 220 paper, 340 paper, 400 paper, 600 paper, and finally 1500 paper. I spent 2 hours per grit all sanded by hand. There was no buffing done; what you see was the 1500 grit. These helmets have a high nickel content steel that shines well when smooth. I have just over 20 hours in the restoration. Ron
In the past, I have used gun bluing on my JzP helmet restorations, as it provides a similar coating to the original, though it is not exactly the same. Have you restored any pieces that you needed to redo the bluing on? Also, I am very impressed by your chinscale reconstruction skills.
You did a professional grade resto of this metal helm. I have at least four metal helm that I will be restoring/conserving and will refer to your comments regarding the polishing of this Kurassier helm, as at least two of them are Kurassiers.
I'm going to copy your technique with the six steps of sanding for two hours each, as I have some Kurassiers that need attention. I look forward to seeing more on this 1860 Kurassier you speak of....
Cheers,
Tim
Last edited:
I have restored 2 jzp helmets. One was a brass trim enlisted. I worked the metal to 600 grit and cold blued the body. It looks quite similar to my original finish one. This helmet was badly dented and deformed, and I needed to work the metal on a spherical steel form with a machinist hammer. The other was an M15 that was surface rusted. I glass beaded it and had the late George Birringer paint it field gray/green. I would like to restore it to original finish, but out of respect to George, I have left it this way for 25 years now. I will post some of my other metal helmet photos when I have time.
Ron
Ron
Pontrest
Active member
I have heard great things about George. It looks to me like you have mastered the liner making as well. It also sounds like you are a machinist or master metal worker. The kind of person who about 115 years ago could have had his own metal shop in Trier, hammering out helmets for the 7th and 8th JzP regiments, among other items.I have restored 2 jzp helmets. One was a brass trim enlisted. I worked the metal to 600 grit and cold blued the body. It looks quite similar to my original finish one. This helmet was badly dented and deformed, and I needed to work the metal on a spherical steel form with a machinist hammer. The other was an M15 that was surface rusted. I glass beaded it and had the late George Birringer paint it field gray/green. I would like to restore it to original finish, but out of respect to George, I have left it this way for 25 years now. I will post some of my other metal helmet photos when I have time.
Ron
Once I'm ready to start back at working on the helmets, I'll post before and after pics.
When making your own liners, do you use a pattern, or how do you go about this? Is there a reference you use?
Regards,
Tim
I’m an automotive engineer and have spent over 40 years collecting headgear and even longer restoring cars.
I start by making a paper template for the liner band. Use several pieces of paper, overlap them inside the helmet and tape together. Trace the lower perimeter of the shell on the paper. Measure up from this line about 2 to 2 1/2” and draw a parallel line. The top of the band usually falls inline with the wappen holes. You need to make half moon cut outs for these holes to allow clearance for wedges or washer/nuts. Cut out the template and transfer mark the leather you plan to use for the band. The ends of the band meet at rear center where the brad crimps the band in the helmet. Use heavy 1/8” thick leather. I use a Dremel rotary tool with a 1/32” burr and drill several parallel evenly space holes at both ends of the band. I then use heavy thread and stitch the band ends together using an x pattern. Allow a 1/4” un-stitched area for the rear retaining brad to pass through. Punch a slot in front of the band for the front brad to pass through. If the liner is for a chin scale helmet, punch holes for the strap mounts.
I look for used leather jackets in thrift shops to harvest leather for the liner. Just make sure to get something large enough that you have no splices. Use the original paper template to create the lower edge of the liner. Add 1/2” to sew under the band. Reference any Pickelhaube liner to create a 3 finger pattern on paper and transfer this to your leather liner. Cut out the leather using heavy duty scissors. Add one inch to the length for finished overlap. Punch 1/8” holes in the ends of the fingers for the draw string.
Use the Dremel again to drill stitch holes in the lower edge of the band 3/16” to 1/4” above the lower edge. Drill the holes 1/8” apart around the band. Place the smooth finished side of the liner to the outside of the band with the edge of the liner flush with the band. Start at the ends and work your way around hand stitching. I stitch all the way around and then reverse back creating a figure 8 stitch pattern. Just as we do stitching visors on pickelhaubes. Leave 1/2” of liner length beyond the band joint for the finished one inch liner end overlap.
Roll the liner leather fingers down and then inside of the band to complete the job. Stitch the ends together with a few stitches. I wet the liner at this point and place on a styrofoam head form with a plastic bag on the form to keep the leather from sticking on the foam. Let it dry for 24 hours and you get a nice shaped fit.
Ron