Latest Project

Rkinkade

Well-known member
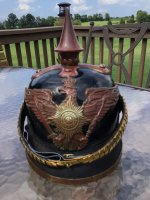
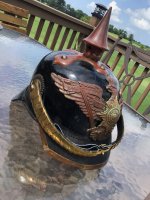
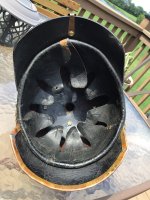
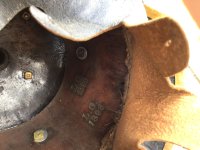
I purchased the Pickelhaube as a parts helmet a couple years ago. It was a shell with the spike and base and wappen and included a pair of Prussian cockades and pre-95 rosettes and bolts. I needed the rosettes and bolts for another project. I sewed in an original liner and rear visor with neck guard. After looking 2 years for a front squared visor with no luck, I took a long fire helmet front brass visor trim and cut, reshaped, and soldered it into the shape that was needed. I used the fire helmet visor leather by cutting it down to fit. This was then sewn into place. Excuse the repro chin scales I have on it for the moment. I love the original red patina. I believe this is a mounted land gendarme helmet. Note the deep embossed markings on the interior photo.

Ron
 

Attachments

  • IMG_0130.jpeg
    IMG_0130.jpeg
    988.1 KB · Views: 10
  • IMG_0131.jpeg
    IMG_0131.jpeg
    1 MB · Views: 10
  • IMG_0132.jpeg
    IMG_0132.jpeg
    1.3 MB · Views: 10
  • IMG_0133.jpeg
    IMG_0133.jpeg
    912.7 KB · Views: 11
Good job. Agree it's definitely Landgendarmerie. I have been considering doing the same with my Prussian line dragoner which was missing its front visor trim. Bought a good one but- much too big for the visor so I have wondered if it could be cut, reshaped and brazed to fit. Not sure if brazing heat would be too much for a good final appearance?
 
Good job. Agree it's definitely Landgendarmerie. I have been considering doing the same with my Prussian line dragoner which was missing its front visor trim. Bought a good one but- much too big for the visor so I have wondered if it could be cut, reshaped and brazed to fit. Not sure if brazing heat would be too much for a good final appearance?
Yes, I have shortened 2 or 3 square peak fittings. The one above, and one other was produced by reshaping and cutting and soldering a trim piece from a round peak. I made a few forming plates from 2mm aluminum sheet but cutting to the shape of a visor and then forming the curvature in a 3 piece pipe roller like heating ductwork is made on. I beveled the forward edge so that the peak trim could be more easily started. By slowly forcing the trim on the form plate and methodically tapping the piece with a hammer, it’s not that difficult. The trick with a clean solder joint is to clean only the surfaces that will be in contact with each other and then place flux only on the same surfaces. The solder will flow to where the clean metal and flux is. I had some clamping fixture issues with the subject peak trim, so my solder joints are pretty ugly. I could sand the excess off and polish it out, but I wanted to retain the adjacent patina. I solder with a propane torch with a small tip and I can keep the temperature pretty low, so discoloration is usually minimal.

Ron
 
Back
Top