seagull
Well-known member
I posted this poor wreck some years ago when Bruno (much missed here) gave me some advice and wished me luck in a major uphill struggle to restore it.


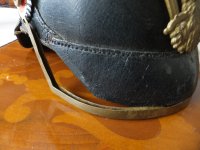
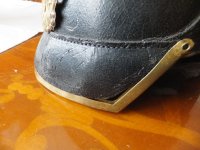
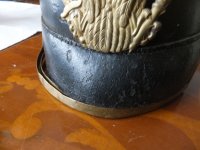
I won't list all it's faults, it's easier to say what was right with it - the shell is still in good shape with not much lacquer loss and made of super strong thick leather, but just about everything else was either wrong, broken or missing. The (wrong) wappen was salvaged for another day but all else had to be found/bought, mainly from eBay France over what turned out to be around four years of looking. The most difficult part to find was the spike, complete Dragoner spikes being pretty rare out there in the wild, so I gambled that I might find a replacement spike base to take the original spike. I eventually bought two, both in battered and flattened condition, since it seemed I had no other option - and one of those turned out to be much too small to be a Dragoner so I was down to one shot at getting it right.
Reshaping that one was a daunting prospect but I found a nylon faced small hammer and went ahead anyway. All I needed now was a table in the garden and some good weather (Wojtek keeps telling me that's all you need!). After profiling a small wedge of very hard Cedar to make a stake I went for it and - it was a positive pleasure to see it regain its shape under that little hammer, despite having multiple curves that go every possible way, all at the same time.
Turned out it took me longer to set up the workspace than it did to do the job!
Four gradual stages of re shaping got it as good as I am capable of getting it - nothing like the standard set by Wojtek and Kenny but this was my first attempt and I am happy with it. I did not replace the rotted liner as this would have meant removing front and rear peaks and I preferred to leave the original strong stitching as is. I left out picures of the first two stages (much too discouraging!) and show the final two stages of hammer work up to initial assembly and before soldering.


Finally, I have a Dragoner. Thanks to Amy for the Knopf washers, to James for the Kokardes, and to Bruno, Wojtek and Kenny for the inspiration. The only repro parts are the four spike bolts from Spikehelmet Berlin and, surprisingly, they have the same thread as the originals. If I get a chance I will replace them with real ones.


Now I just have to figure out how to modify the front peak trim to fit!!
Cheers all, Steve
I won't list all it's faults, it's easier to say what was right with it - the shell is still in good shape with not much lacquer loss and made of super strong thick leather, but just about everything else was either wrong, broken or missing. The (wrong) wappen was salvaged for another day but all else had to be found/bought, mainly from eBay France over what turned out to be around four years of looking. The most difficult part to find was the spike, complete Dragoner spikes being pretty rare out there in the wild, so I gambled that I might find a replacement spike base to take the original spike. I eventually bought two, both in battered and flattened condition, since it seemed I had no other option - and one of those turned out to be much too small to be a Dragoner so I was down to one shot at getting it right.
Reshaping that one was a daunting prospect but I found a nylon faced small hammer and went ahead anyway. All I needed now was a table in the garden and some good weather (Wojtek keeps telling me that's all you need!). After profiling a small wedge of very hard Cedar to make a stake I went for it and - it was a positive pleasure to see it regain its shape under that little hammer, despite having multiple curves that go every possible way, all at the same time.
Turned out it took me longer to set up the workspace than it did to do the job!
Four gradual stages of re shaping got it as good as I am capable of getting it - nothing like the standard set by Wojtek and Kenny but this was my first attempt and I am happy with it. I did not replace the rotted liner as this would have meant removing front and rear peaks and I preferred to leave the original strong stitching as is. I left out picures of the first two stages (much too discouraging!) and show the final two stages of hammer work up to initial assembly and before soldering.
Finally, I have a Dragoner. Thanks to Amy for the Knopf washers, to James for the Kokardes, and to Bruno, Wojtek and Kenny for the inspiration. The only repro parts are the four spike bolts from Spikehelmet Berlin and, surprisingly, they have the same thread as the originals. If I get a chance I will replace them with real ones.
Now I just have to figure out how to modify the front peak trim to fit!!
Cheers all, Steve
Last edited:
")
")