Mecklenburg Officer JR 90

Progress on this project has been slow. I caught some sort of cold at the SOS end of February and I have been fighting off cough and fever ever since. Last week, I was diagnosed with "walking pneumonia" which explains what has been going on. Anyway, after some "super antibiotics" I am beginning to feel better. So, I have worked on this helmet:
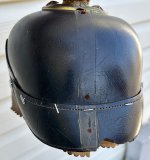
IMG_3848.jpeg
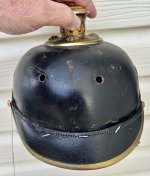
Pinned into place and restitch started. I don't usually stitch with the trim on but in some cases it is on very firmly and you don't want to risk damaging the visor.
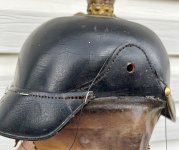
IMG_3851.jpeg
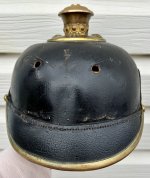
I finished the first stitch pass today.
IMG_3852.jpeg
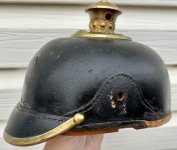
I keep an antique hat stretcher in the helmet when not stitching....these are very handy! Depending on the helmet, I will also sometimes stitch with the stretcher in (tilted at an angle) which keeps the shell open. It does not make sense to stitch a visor back on a semi collapsed shell. More to come Bob!
 
Progress on this project has been slow. I caught some sort of cold at the SOS end of February and I have been fighting off cough and fever ever since. Last week, I was diagnosed with "walking pneumonia" which explains what has been going on. Anyway, after some "super antibiotics" I am beginning to feel better. So, I have worked on this helmet:
View attachment 58806
Pinned into place and restitch started. I don't usually stitch with the trim on but in some cases it is on very firmly and you don't want to risk damaging the visor.
View attachment 58809
I finished the first stitch pass today.
View attachment 58808
I keep an antique hat stretcher in the helmet when not stitching....these are very handy! Depending on the helmet, I will also sometimes stitch with the stretcher in (tilted at an angle) which keeps the shell open. It does not make sense to stitch a visor back on a semi collapsed shell. More to come Bob!
Brian
I remember the "Rocking pneumonia and the boogie woggie flue " I hope that you are feeling better .
Steve
 
Last edited:
Oh man - sorry to hear that Brian. Considering how many people come through that show, I'm surprised everyone doesn't end up sick! Best wishes for a speedy recovery. 👍
 
Yes too much hand shaking with friends and of course strangers when a sale is completed. I let my guard down and got this result. I have often come down with a cold after the SOS unfortunately, but not like this. I usually blame James by the way. 😄😄
 
Thanks Steve! :) I remember that song as well!
Brian
My wife looked it up for me
She said it was recorded by Johnny Rivers
I would NOT have guessed him
Back when I was in the Naval Air Reserve in the 1960's , we did a 2 week drill in L A
we have time off on the weekend
and some of us rented a car and we went into L A and Hollywood
I saw Johnny Rivers live at the Whiskey - A Go Go
Steve
 
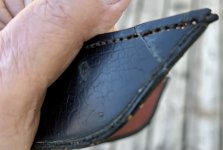
This helmet has proven to be a bit of a "Problem Chile" with some surprises! 😐 I finished the front visor on Saturday and started pining the rear visor when snap, the right corner broke. I have pinned a hundred of these by now and never had a problem. However, we are dealing with 120 year old thin leather here which is dried out and very delicate. A portion of this visor had already gone missing before I received the helmet. :( Anyway, some photos of what had to be done.
IMG_3856.jpeg
First the two pieces were glued back together with leather glue.
IMG_3855.jpeg
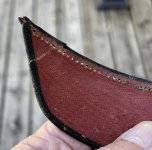
Fortunately, the red fabric on the underside had not broken through. I brushed on an application of white leather glue along this crack. However, the crack still has to be reinforced with a patch.
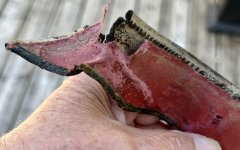
IMG_3857.jpegFortunately, I have a scrapper visor which can provide some red cloth. This visor comes from a CEF bring back Prussian pioneer officer helmet which I scored locally 30 years ago. I still have the helmet and fittings, all I need is to stitch on a replacement visor! Note this visor is fibre/card board.
IMG_3858.jpegWe don't have a perfect colour match here but this will have to do. The patch covers part of the stitch line because the leather between the holes in that small area is just ready to break when stitching begins. Once I have to visor on, I will apply some finish to the crack and try to fill it in as much as possible.
IMG_3854.jpeg
Visor pinned and ready to start. Obviously the visor wants to pull the shell inward and as mentioned before, I will be inserting a small hat stretcher into the shell to keep it open. This forces the visor to conform to the shell not the other way round. Are we having fun yet!!! :D
 
I appreciate your efforts Brian. Been there myself. When I need red or green oil cloth for visors, I find an old cloth covered book and harvest the fabric. It’ virtually identical to original. Many color shades out there, but it’s easy to find what looks period, also dependent on wear. You can even keep the book if it’s a good one! Ron
 
This helmet has proven to be a bit of a "Problem Chile" with some surprises! 😐 I finished the front visor on Saturday and started pining the rear visor when snap, the right corner broke. I have pinned a hundred of these by now and never had a problem. However, we are dealing with 120 year old thin leather here which is dried out and very delicate. A portion of this visor had already gone missing before I received the helmet. :( Anyway, some photos of what had to be done.
View attachment 58948
First the two pieces were glued back together with leather glue.
View attachment 58949
Fortunately, the red fabric on the underside had not broken through. I brushed on an application of white leather glue along this crack. However, the crack still has to be reinforced with a patch.
View attachment 58950Fortunately, I have a scrapper visor which can provide some red cloth. This visor comes from a CEF bring back Prussian pioneer officer helmet which I scored locally 30 years ago. I still have the helmet and fittings, all I need is to stitch on a replacement visor! Note this visor is fibre/card board.
View attachment 58951We don't have a perfect colour match here but this will have to do. The patch covers part of the stitch line because the leather between the holes in that small area is just ready to break when stitching begins. Once I have to visor on, I will apply some finish to the crack and try to fill it in as much as possible.
View attachment 58952
Visor pinned and ready to start. Obviously the visor wants to pull the shell inward and as mentioned before, I will be inserting a small hat stretcher into the shell to keep it open. This forces the visor to conform to the shell not the other way round. Are we having fun yet!!! :D
Lots of extra, unexpected work
but you did well
as always
Steve
 
This thing just keeps on fighting me! 😐
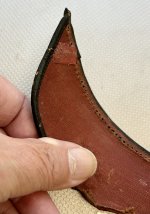
I tried to start the rear visor stitch yesterday. I began naturally with the "unbroken" corner but yet again "snap" and that corner broke as well. This visor has the consistency of a saltine cracker!! :mad: In 40+ years of doing this, I have never had this problem. Anyway we shall soldier on unless hopefully the owner is tired of waiting and wants it back as is.
IMG_3862.jpeg
 
Hang in there Brian. Your first statement “This thing just keeps on fighting me” echoes my very words on many similar projects. The broken stitch holes make for a challenge. Can you use the red cloth backing as a reinforcement with fabric glue between it and the leather? Or add an additional narrow strip of cloth glued to the back side of the visor to be hidden in the overlap. Then you still have the possibility of additional breaks farther along the stitch line. Ugh! A replacement visor may be in order. Ron
 
Thanks Ron, my frustration got the better of me yesterday. I have used the cloth strip method in the past and yes that is what is needed here. Either cloth or a very thin strip of leather will be glued along that stitch line. Plan B as you said would be to replace the visor altogether but I don't think I have one. Plan B also involves getting the approximate correct size to fit this shell and the spine. As I said, we soldier on here. (y)
 
Brian you're the man that one is a tuff nut to crack.

I don't feel so bad now after putting you through hell with that visor cap you repaired for me. I still really appreciate your extraordinary efforts it s looks beautiful. (y)(y)
 
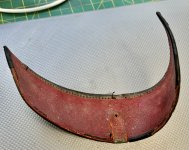
Initiating "Plan B" :) after getting over my frustration. After 40+ years of doing this, I have some spare parts. Shown below, an officer rear visor which I am sure will fit this helmet.
IMG_3870.jpeg
This one is in much better condition than the original but does have to be hydrated and then pinned to a head form to get it back into proper shape. Note also that some of these are not stitched underneath the spine.
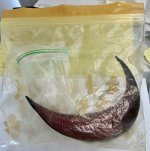
IMG_3874.jpeg
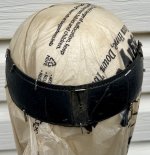
Hydration underway. I have described this before but for new members......Wet paper towel is placed in the smaller bag to provide humidity and then the visor itself is put in the larger bag, sealed. After a few days, the leather will soften and then it can be pinned to a head form (covered in plastic bag) to get the correct shape. The hydration will probably cause the old hide glue to give way so the "red cloth" will have to be re glued. An entire helmet can be softened in this way but you must keep careful watch or the finish will drop off the shell...right James? :)
 
Last edited:
Back
Top