Merry Christmas! New member here - How should I go about reshaping my Pickelhaube

HatEnjoyer

Active member
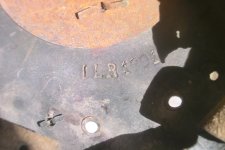
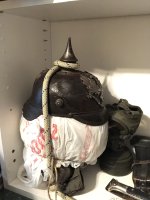
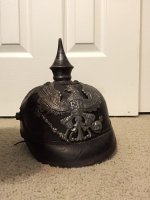
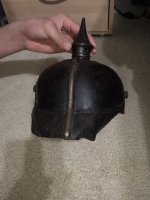
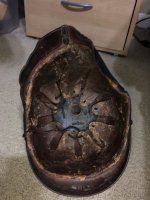
Hi! I acquired this pickelhaube a while ago, and I was wondering if anyone could help me out with a question I have. As seen in the pictures below, both the shell and rear visor of the pickelhaube are deformed, and its liner is very delicate.

Now I have done some searching through this forum’s pickelhaube restoration section, and Ive seen multiple instances of both water + vinegar mixtures and baths of lukewarm water being used to reshape pickelhaube shells and pieces, however, I was wondering how I should go about doing these methods with my pickelhaube, and what precisely I need to do in order to reshape it. I don’t want to damage the liner as again, it is very delicate, and I am not sure exactly how to use my hands to reshape the helmet.

Also, wouldn’t water dry out the leather? How would drying out the leather be prevented? Thank you!

TL;DR: what are the exact steps to reshaping a pickelhaube using a water + vinegar mixture or a bath of lukewarm water, and should I even do it with the liner still being retained?
 

Attachments

  • IMG_7335.jpeg
    IMG_7335.jpeg
    847 KB · Views: 35
  • IMG_7341.jpeg
    IMG_7341.jpeg
    1,023.6 KB · Views: 35
  • IMG_7339.jpeg
    IMG_7339.jpeg
    1 MB · Views: 35
Hi,
Welcome to the forum, there are several members that have experience in reshaping helmets.
As far as I remember soaking in water is the last option, with humidity being the preferred option.
Regards,
Lars
 
Hi,
Welcome to the forum, there are several members that have experience in reshaping helmets.
As far as I remember soaking in water is the last option, with humidity being the preferred option.
Regards,
Lars
Thanks for the reply! I've never heard of the humidity option, could you enlighten me on how that would be executed?
 
Welcome to the forum. The humidity option: The object here is to put some moisture back into the helmet shell and then block it back into its original shape or at least improve things. Take a plastic grocery bag with no tears or possible leaks, place a wet ball of newspaper in this bag and then put this in your helmet. Finally, place your helmet in a larger plastic bag again with no holes and seal this up. The wet newspaper will humidify the air inside the bag and thus your helmet. Keep the helmet bagged for a couple of days and then check to see if the shell has softened. You can’t leave it bagged for too long as the black shellac finish will start to flake off and mould will begin to form. Once the shell has softened then you can use a styrofoam head form or hat stretcher to block the shell back into shape and allow it to dry. Your styrofoam head has to be larger than your helmet and cover it in plastic (a bag) so the helmet doesn’t stick to it. Wetting an entire helmet in water and vinegar is a very radical operation and normally is only done to a very damaged, misshapen helmet. This also will require that the helmet has to be refinished. You really have to be an expert to pull this off successfully.
 
Welcome to the forum. The humidity option: The object here is to put some moisture back into the helmet shell and then block it back into its original shape or at least improve things. Take a plastic grocery bag with no tears or possible leaks, place a wet ball of newspaper in this bag and then put this in your helmet. Finally, place your helmet in a larger plastic bag again with no holes and seal this up. The wet newspaper will humidify the air inside the bag and thus your helmet. Keep the helmet bagged for a couple of days and then check to see if the shell has softened. You can’t leave it bagged for too long as the black shellac finish will start to flake off and mould will begin to form. Once the shell has softened then you can use a styrofoam head form or hat stretcher to block the shell back into shape and allow it to dry. Your styrofoam head has to be larger than your helmet and cover it in plastic (a bag) so the helmet doesn’t stick to it. Wetting an entire helmet in water and vinegar is a very radical operation and normally is only done to a very damaged, misshapen helmet. This also will require that the helmet has to be refinished. You really have to be an expert to pull this off successfully.
Thanks for the explanation! Do you think my pickelhaube would be a good candidate for this method?
 
Here are 3 of them, each with a before-and-after photo.

1---Before
Bay1  IR Bibi350€ Ciney AVANT.JPG
1---After :
Bay1 IR Bibi 350€   Ciney APRES.JPG


2---Before
0177R bibi avant.JPG
2---After :
0177R fini...JPG


I had a very good result with the next one: an Eigentum that was pretty well crushed. I just couldn't do anything about the rodent nibbles.
3---Before :
0! Avant-après BIBI.jpg
3---After :
0!! Après-avant BIBI.jpg
Stay tuned for my technical demonstration.
 
The principle is to rehydrate the leather, making it supple and malleable. Then we leave it to dry on a form (like a headband), bearing in mind that dry leather retains its shape memory.
First, I dampen the part to be straightened or reshaped. I use a spray bottle (for cleaning windows) or a garden sprayer. I dampen the part to be straightened or reshaped first . Always on the inside, as the outside is waterproof thanks to the coating. You need distilled water, tempered to 35-40°C. Then I place my shell on the mold, and let it dry for 2 or 3 days at room temperature (not on a radiator, not behind glass in the sun). For the neck cover, I use shims (clothespins or similar) to give the necessary angle.
démo Formes.JPGdémo I LR.JPGdemo.JPGdémo ILR.JPGdémo bombe.JPG
The electrical wire, made of plasticized copper, forces the schell to remain pressed onto the form.
 
Note that Clovis is using an antique wooden hat mold shown on the left in his photo. These are the best things to use as they were originally used in felt hat making. Today’s modern styrofoam heads are generally too small. The hydrated shell needs to be forced back out into its original circumference. You can also use antique wooden hat stretchers to do the same thing. There are modern ones for sale on EBay but they are poorly made, the old ones work the best. They are also adjustable. Regarding your Prussian M15 helmet, with care you should be able to improve it using this technique. Your liner has dried out and the black finish is flaking off as a result. If the liner is a red rusty colour then it has “red rot”. There is no cure for this as the leather has dried out so much that it will just disintegrate if handled. Clovis used wire to hold his helmet down on the head form but you can also use long elastics to apply pressure.
 
The principle is to rehydrate the leather, making it supple and malleable. Then we leave it to dry on a form (like a headband), bearing in mind that dry leather retains its shape memory.
First, I dampen the part to be straightened or reshaped. I use a spray bottle (for cleaning windows) or a garden sprayer. I dampen the part to be straightened or reshaped first . Always on the inside, as the outside is waterproof thanks to the coating. You need distilled water, tempered to 35-40°C. Then I place my shell on the mold, and let it dry for 2 or 3 days at room temperature (not on a radiator, not behind glass in the sun). For the neck cover, I use shims (clothespins or similar) to give the necessary angle.
View attachment 40363View attachment 40364View attachment 40365View attachment 40366View attachment 40367
The electrical wire, made of plasticized copper, forces the schell to remain pressed onto the form.
Thanks for showing your method! I will try it and keep ya’ll posted on the process.
 
Note that Clovis is using an antique wooden hat mold shown on the left in his photo. These are the best things to use as they were originally used in felt hat making. Today’s modern styrofoam heads are generally too small. The hydrated shell needs to be forced back out into its original circumference. You can also use antique wooden hat stretchers to do the same thing. There are modern ones for sale on EBay but they are poorly made, the old ones work the best. They are also adjustable. Regarding your Prussian M15 helmet, with care you should be able to improve it using this technique. Your liner has dried out and the black finish is flaking off as a result. If the liner is a red rusty colour then it has “red rot”. There is no cure for this as the leather has dried out so much that it will just disintegrate if handled. Clovis used wire to hold his helmet down on the head form but you can also use long elastics to apply pressure.
Noted, thanks again for all the help!
 
Here are 3 of them, each with a before-and-after photo.

1---Before
View attachment 40354
1---After :
View attachment 40355


2---Before
View attachment 40356
2---After :
View attachment 40357


I had a very good result with the next one: an Eigentum that was pretty well crushed. I just couldn't do anything about the rodent nibbles.
3---Before :
View attachment 40360
3---After :
View attachment 40361
Stay tuned for my technical demonstration.
That # 3 is pure magic !
Steve
 
That # 3 is pure magic !
Steve
Yes, it was the nastiest of those I was able to save.
Here are some exterior views of the first one shown. Very oxidized and dirty wreck of a Bavarian bought in Ciney late this morning. After cleaning, the copper was nickel silver, and a superb mark appeared: Leib-Infanterie-Regiment.

Bay 1IR Bibi 350€ Ciney17 à l'achat.JPGBay1IR Bibi Ciney17 APRES.JPGBay 1IR Bibi 350€ Ciney17.JPGBay1IR Bibi 350€   Ciney17 APRES.JPG
The "after" photos were taken on the day of restoration. Since the nickel silver has taken on a bit of a patina. I didn't want to touch the black varnish.
Bay1IR  Ciney Bibi marquage.JPG
Note that this was an old M1886 hull recycled as an M1896. The holes in the large front plate and the cross base of the tip are plugged with small aluminum rivets, as is often the case with Bavarians.
 

Attachments

  • Bay1IR  Ciney Bibi marquage.JPG
    Bay1IR Ciney Bibi marquage.JPG
    2.9 MB · Views: 2
There are only two ways to screw this up….leave the helmet in the bag too long and not having a head form big enough to stretch the leather back into its original circumference. Be sure to let it dry for about 5 days just to be sure.
 
Tried Clovis’ method, I used a styrofoam head which’s circumference I thickened with a bunch of cloth scrap from my sewing projects. I then put a plastic bag over the head to hold the fabric in place and to help the pickelhaube’s liner slide easier onto the head. The pickelhaube is currently hanging out with my WWII German items in an area away from sunlight.
 

Attachments

  • IMG_7353.jpeg
    IMG_7353.jpeg
    878.5 KB · Views: 18
It has officially been 48 hours since I started the reshaping process! Unfortunately, it seems one of the previous owners put a little bit of oil/product on the rear visor, so it didn't absorb too much of the water that I applied to it, but it did take enough in to mostly straighten out. I included the before/after photo below!

Thanks to everyone who helped me with my first pickelhaube "restoration"! I will admit, I used to only be obsessed with restoring stahlhelms, but I think I'm hooked on pickelhauben restorations now.

Screen Shot 2023-12-29 at 5.00.54 PM.png
 
Last edited:
It looks a lot better, good job!
Thank you, For my first time, I'm happy with how it turned out. I would like to into the craft of restoring pickelhauben, so I will probably buy myself a reproduction pickelhaube to practice on and a proper wooden hat mold to get better results when reshaping.
 
Even with an antique wooden hat mold, I would recommend you cover it with a plastic bag before you put your humidified helmet project on it. These molds and the styrofoam heads can also be used to fix sunken helmet tops which is another common problem with these pieces. There is a great deal of information in the restoration section.
 
Back
Top