New Project: Bavarian Officer Schirmmutze Chevl. 3 & 6

b.loree

Administrator
Staff member
A new project sent to me by one of our members for restoration. I have never done one of these so this is going to be a challenge.
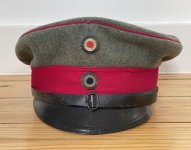
The "before" photos:
IMG_4459.jpeg
I think this photo alone explains what has to be done. Nice Reichs and Bavarian officer kokarden.
IMG_4461.jpeg
The cap has an interesting chin strap with a snap fitting to secure the strap.
IMG_4458.jpeg
The interior, this cap has seen decades of "crushing " abuse. The leather visor is flexible and in decent condition.
IMG_4478.jpeg
The heavy shellac finish on the visor has been subjected to "heat" over the years and we see a common result here. The finish has melted over the stitch line which also is common on hauben.IMG_4473.jpegAssembling the tools. I am in Florida right now and love to work in bright natural light.
IMG_4483.jpeg
Removing the visor was a bit of a struggle as someone had tried to restitch it. They gave up however and decided to try glue instead! :(
IMG_4482.jpeg
After years of abuse, the visor is severely misshapen. I am going to hydrate this for a couple of days and then pin it to a head form to dry. Hopefully, this will put it back into. a more original shape. If I can achieve this, restitching the visor to the hat will help "pull" it back into better shape. 🤞All of the stitch holes need to be cleaned out especially those where the finish melted. To be continued....
 
Last edited:
Chevauleger? I'll be interested in the outcome, Brian! That glue technique is sadly not uncommon. (Would be interested in any safe glue removal tips you can share, in fact).

A worthy project - it's a lovely cap. 👍🏼
 
The glue treatment is also common on haube visors in my restoration experience. I find this visor more haube like in its thickness of leather and the heavy, melted shellac finish. I have only owned one Bavarian dunkelblau officer visor cap and it had a very thin patent leather type visor. I have also had the privilege of combing through Tony’s collection on several occasions, examining both hauben and numerous schirmmutzen. The visor caps were mostly dunkelblau and very light with thin visors. I leave it to more experienced collectors to comment here on my observations.
 
Chevauleger? I'll be interested in the outcome, Brian! That glue technique is sadly not uncommon. (Would be interested in any safe glue removal tips you can share, in fact).

A worthy project - it's a lovely cap. 👍🏼
I also like it a lot, what regiment had that pink colour? ( I know one of the Hanoverian Ulan and some dragoon had krimson as farbe)
 
I believe it's from the Royal Bavarian 3rd and 6th Chevaulegers Regiments. The Chevaulegers had one regimental color for two Regiments.

If anyone has Kraus's book take a quick look at page 404 there is a very similar example even down to the melted shellac finish and the style of visor.
 
Last edited:
I believe it's from the Royal Bavarian 3rd and 6th Chevaulegers Regiments. The Chevaulegers had one regimental color for two Regiments.

If anyone has Kraus's book take a quick look at page 404 there is a very similar example even down to the melted shellac finish and the style of visor.
Yes, for me it’s 3rd or 6th Chevaulegers!

6th is my all time favourite regiment! Bayreuth…

Best wishes

GardeUlan
 
I also like it a lot, what regiment had that pink colour? ( I know one of the Hanoverian Ulan and some dragoon had krimson as farbe)

As John Josef mentioned, it is Chevauleger Regiments 3 and 6. The color is "Pfirsichrot" or peach red, and is unique to these Chevauleger regiments. The cap in the foreground is Ch.R.6 and has a Pfirsichrot band and piping. It is a distinctly different color than the "Rosa" pink used by certain Prussian cavalry regiments, being a slightly warmer orange/red hue.

The one in the background has the "Karmesinrot" or crimson red used by Chevauleger Regiments 1 and 2, and both Bavarian Ulan regiments.

Chev Colors.jpg
 
As John Josef mentioned, it is Chevauleger Regiments 3 and 6. The color is "Pfirsichrot" or peach red, and is unique to these Chevauleger regiments. The cap in the foreground is Ch.R.6 and has a Pfirsichrot band and piping. It is a distinctly different color than the "Rosa" pink used by certain Prussian cavalry regiments, being a slightly warmer orange/red hue.

The one in the background has the "Karmesinrot" or crimson red used by Chevauleger Regiments 1 and 2, and both Bavarian Ulan regiments.

View attachment 41437
Yes, This would be UR 1, UR 2 or Chev 1 or 2.

Best wishes?

GardeUlan
 

Attachments

  • 1ED7C3A0-A690-4B0F-8BC2-8334E318845C.jpeg
    1ED7C3A0-A690-4B0F-8BC2-8334E318845C.jpeg
    2.8 MB · Views: 12
As mentioned the visor was hydrated for a week and then pinned to try and get it back into a more original shape before restitching. This did very little unfortunately other than to make the leather more flexible. Consequently, using a sponge, I applied water along the stitch line. I want to stiffen the leather and let it dry into a more original shape so that it does not pull the cloth of the cap upon itself as we saw in our first group of photos.
IMG_4488.jpeg
So, I have wet the stitch line and pinned the piece again. Hopefully, the visor will stiffen and dry into a more original shape. Patience has to be a watch word in restoration.
 
It took me awhile and a couple of phone calls to Tony S. to understand how to stitch this visor back on. Fortunately, the weather in Fla has turned for the better in the realm of bright sunshine. As Wojtek said recently, a sunny day outside is best for any kind of restitching. Trying to restitch during the winter in CN or Poland with very few sunny days and cold temperatures is a problem. Anyway, this is where we are at right now after some stitching today:
IMG_4499.jpeg
First, the visor had to be pinned into position.I counted the number of stitch holes in the visor and divided by 2 to find the central stitch hole. I used the kokarden to find the central stitch hole in the sweatband. A shown, I pinned outward from this centre point.
IMG_4501.jpeg
The visor is stitched back on to the rim of the cap. There are gaps between stitches as I only did the first "pass" along the visor today. The gaps will be filled in when I stitch back across the visor. Black was the original thread colour used.
IMG_4505.jpeg
The chin strap covers the stitch line as does the sweatband on the inside when it is folded back down into position. I love this pink colour, it looks very cool!
 
Last edited:
It took me awhile and a couple of phone calls to Tony S. to understand how to stitch this visor back on. Fortunately, the weather in Fla has turned for the better in the realm of bright sunshine. As Wojtek said recently, a sunny day outside is best for any kind of restitching. Trying to restitch during the winter in CN or Poland with very few sunny days and cold temperatures is a problem. Anyway, this is where we are at right now after some stitching today:
View attachment 41776
First, the visor had to be pinned into position.I counted the number of stitch holes in the visor and divided by 2 to find the central stitch hole. I used the kokarden to find the central stitch hole in the sweatband. A shown, I pinned outward from this centre point.
View attachment 41777
The visor is stitched back on to the rim of the cap. There are gaps between stitches as I only did the first "pass" along the visor today. The gaps will be filled in when I stitch back across the visor. Black was the original thread colour used.
View attachment 41779
The chin strap covers the stitch line as does the sweatband on the inside when it is folded back down into position. I love this pink colour, it looks very cool!
Nice hat and great work
well done
Steve
 
Back
Top