Officer Helmet Feld. Arty 10 or 46

b.loree

Administrator
Staff member
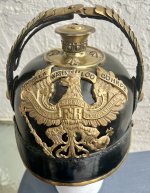
My next project: Officer helmet from either Feld Arty 10 or 46. This comes with the beautiful pre 1913 wappen with 3 Napoleonic War Bandeaux. A 4th battle honour was added after this year. This helmet has the old style officer liner with leather fingers and no coloured silk. Obviously, this liner is much easier to work with! The photos:
IMG_4533.jpeg
As always the kugel has been removed for shipment. I will be removing this wappen so we can look at the "construction"of this bad boy! Uber Rare!! :)
 

Attachments

  • IMG_4534.jpeg
    IMG_4534.jpeg
    1.9 MB · Views: 12
Last edited:
IMG_4535.jpeg
Side view.
IMG_4591 2.jpeg
Carefully removing the spine and discovering an insect nest!
IMG_4590 2.jpeg
This spine has one screw post, one soldered split pin. Some spines have 2 pins. Note also the pre 1900 officer liner with squared fingers.
IMG_4593.jpeg
The split pin and tang found on most officer spines. The. liner here is in good condition and complete.
 
Last edited:
Very Nice !!!
For your information, the Hanoverian victory- banners are always added and soldered with tin onto the officer's eagle.
They were also added to the enlisted eagle in 1899, when it became necessary to add them to the line eagles on helmets already in service. However, for new helmets manufactured after 1900, the enlisted eagles were stamped with the Vaterland banner, and the victory- banners were made from a single piece of metal.
 
Thank you for that extra information Clovis 👍
IMG_4532 2.jpeg
The pre 1900 liner is in good condition and complete. These liners although less stylish than the coloured silk are much more robust.!IMG_4609.jpegMy apologies for the poor photo, it had to be taken inside as we have lost access to our balcony area. :( Stitch line cleaned out.
IMG_4608.jpeg
We saw the insect nest and here is the damage. This beastie ate the red leather all along the stitch line! 😐 This was not a spider! It is also surprising that the liner was not chewed as well. This is a new for me, in all my years of doing this I have never seen this type of insect work.
 
Last edited:
Hello,
I don't think it's an insect. I think the thin red leather became stuck to the rubber under the pressure of the stitching, and when the neck guard was removed, the thin leather tore away from the neck guard's leather. Rubber can liquefy in the heat of the sun, for example, and solidify again when it cools. We sometimes see this kind of sticking, with the back of the chin straps against the shell, or behind the roundels that remain stuck around the attachment point.
 
Thank you for the comment Clovis and as I have worked on many of these officer helmets, I know exactly what you are talking about. This is insect damage, not something caused by melted shellac finish. The damage you describe happens along the stitch line where the shellac melts into the red cloth/leather lining of the visor. In this case we can see that the insect has chewed well below the stitch line. There is no remnants of torn red liner. The damn insect ate everything very cleanly! :) Regarding officer kokarden with their "card board" backing, again I have pried many. of these off a shell where the shellac melts and the kokarde is stuck on. 90% of the time the cardboard tears and sticks to the shell and you have to scrape this off. When this happens, I cut out a new one, spray it with black paint and place this back onto the kokarde.
 
I worked a bit on this helmet today, pinned the visor for stitching and removed the wappen to have a look.
IMG_4621.jpeg
Exquisite detail to this pre 1913 officer wappen!
IMG_4622.jpeg
We can see that the Battle Honours Peninsula and Gohrde are separate and carefully soldered in 2 spots on each wing. Waterloo has a space where it is soldered to the crown. A good deal of thought and care went into this design. :) BTW both brass square nuts and tin washers are still with this piece. There are no extra wappen holes in the shell.
 
Further progress:
IMG_4629.jpeg
Pinned and ready to go. As usual the imprint lines in the shellac finish are used to line up the holes. . When I first started years ago, I used to strat pining at the corners and count holes across the stitch line. Now I start from the middle, and count/pin out to the corners. I finished the first pass across the stitch line today, lots of sunshine!
IMG_4632.jpeg
Something I have never seen in decades of doing this...the chin scale rosettes do not have the usual bent prongs. I will take this apart tomorrow and we can see how this works. :) Unusually long prongs on the visor pins!
 
As I suspected the rosette has a finely threaded post fastened to it which screw into the brass washer (?) shown above. I could have removed everything shown but if I do that then I have to align those threads in a small helmet shell (56 cm).
IMG_4634.jpeg
There is always something new to discover in the world of pickelhauben! We also see a brass staple used here. I have seen this before but it is not common.
 
Finished:
IMG_4637.jpeg
Completed yesterday. Now on to the next project sent by this member....a Garde Officer. I would also appreciate any comments about the chin scale fasteners. Has any member seen this type before?
PS: The insect damage can not be seen with the visor back in place.
 
Last edited:
Back
Top