
You are using an out of date browser. It may not display this or other websites correctly.
You should upgrade or use an alternative browser.
You should upgrade or use an alternative browser.
Pattern for an officers pickelhaube liner.
- Thread starter Tenente
- Start date
Pontiac9999
Well-known member
Unfortunately not. You would have to recreate one that is slightly curved and has all the little half circles on it. It's very time consuming, but highly rewarding!
Tenente
Member
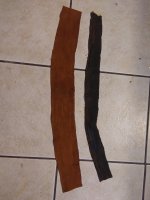
I have that part done. The shitty liner I took out was shaped like a hockey stick, instead of having a gradual curve. So I made mine with a slight curve, and the scallops on the other side. But I'm not sure how extreme the curve needs to be.Unfortunately not. You would have to recreate one that is slightly curved and has all the little half circles on it. It's very time consuming, but highly rewarding!
Attachments

Pontiac9999
Well-known member
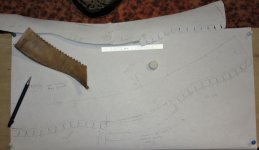
Here's a little something I worked on a long time ago. I sketched up the liner and made it symmetrical. I measured exact sizes using an existing piece then developed a patter on a large sheet of paper. I added details after and roughly sketched out the circles on top, for which I later used a template to cut them out (which was painstaking and time consuming, but like I said, very rewarding).
Attachments
Pontiac9999
Well-known member
I must have made a couple of versions, perfecting each one before cutting the leather. As I always say, measure 14 times and cut once...lol
Last edited:
Pontiac9999
Well-known member
Pontiac9999
Well-known member
Make paper ones first before cutting out the leather!Ok, I'm taking the plunge and trying my hand at replacing a liner in an officers pickelhaube. Is there a pattern I could follow here on this site?
Tenente
Member
I should have done that first. I still have more leather, but I don't want to repeat the same mistake.Make paper ones first before cutting out the leather!
Tenente
Member
Ok, How was this pattern installed? I mean where on the helmet s outer rim do you place the extreme bell curves that you have here?Here's a little something I worked on a long time ago. I sketched up the liner and made it symmetrical. I measured exact sizes using an existing piece then developed a patter on a large sheet of paper. I added details after and roughly sketched out the circles on top, for which I later used a template to cut them out (which was painstaking and time consuming, but like I said, very rewarding).
Sandmann
Well-known member
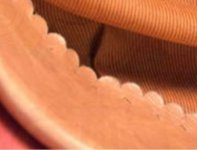
Interesting post, but I would suggest to use of this scissors for the edge pattern:
Cloud pattern scissors
Cloud pattern scissors
Tenente
Member
I bought those scissors, I believe I have the 5mm versions, but I'm liking the 7mm versions better.Interesting post, but I would suggest to use of this scissors for the edge pattern:
Cloud pattern scissors
Pontiac9999
Well-known member
Actually, this was for an officer tschapka helmet that is why there is extreme curves. All I had was a small piece of old liner and used it to make the large paper template.Ok, How was this pattern installed? I mean where on the helmet s outer rim do you place the extreme bell curves that you have here?
Pontiac9999
Well-known member
Your cloud pattern is nice, but the original pattern is more circular. I'm sure when they made the liner 100+ years ago the probably had a metal die and press that punched them out.
Pontiac9999
Well-known member
An officer pickelhaube liner will be much less curved and you will have to add some extra material as it is stitched onto the shell and then flipped inward.....
There is a lot of description here about liners being “curved “. I presume you are talking about the bottom edge of the liner which is stitched to the edge of the shell. This edge is not curved, it is straight. A 100 year old officer sweat band may look curved after you remove it but originally, the stitching edge was straight. The edge of the shell is a straight plane so you don’t need a curved edge. I faced this problem years ago when I wanted to make my first OR’s liner, I thought it should be curved but then I put the question to a Math teacher and he assured me a straight edge was the correct way to go. Subsequently, I have made and installed a number of reproduction liners without any problems.
A tschapka liner is totally different and more complex. It does have curves to match the curves in the edge of the shell.
A tschapka liner is totally different and more complex. It does have curves to match the curves in the edge of the shell.
Sandmann
Well-known member
I'm sure it was done with scissors like this in the past and there exists different patterns. I only have 4 officer helmets, but my helmets alone have 2 different patterns. So I don't think you have to be too specific.Your cloud pattern is nice, but the original pattern is more circular. I'm sure when they made the liner 100+ years ago the probably had a metal die and press that punched them out.


Attachments
pickelhauben
Well-known member
Those scissors must be relatively new.
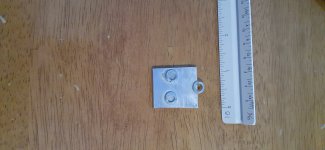
I made a leather stamp for the late helmet restorer George Birringer back in the day.
It consisted of 4 rounded chisel points soldered together.
These scissors would make the scalloping a sinch.
I made a leather stamp for the late helmet restorer George Birringer back in the day.
It consisted of 4 rounded chisel points soldered together.
These scissors would make the scalloping a sinch.
Tenente
Member
Thanks B. I originally thought that was the case but was not sure. I'll do that on the second attempt.There is a lot of description here about liners being “curved “. I presume you are talking about the bottom edge of the liner which is stitched to the edge of the shell. This edge is not curved, it is straight. A 100 year old officer sweat band may look curved after you remove it but originally, the stitching edge was straight. The edge of the shell is a straight plane so you don’t need a curved edge. I faced this problem years ago when I wanted to make my first OR’s liner, I thought it should be curved but then I put the question to a Math teacher and he assured me a straight edge was the correct way to go. Subsequently, I have made and installed a number of reproduction liners without any problems.
A tschapka liner is totally different and more complex. It does have curves to match the curves in the edge of the shell.
Tenente
Member
They've been around for a while. Problem was they were usually meant for industry use, or serious fabric hobbyists. Most people never needed o use them so they were seldom seen.Those scissors must be relatively new.
I made a leather stamp for the late helmet restorer George Birringer back in the day.
It consisted of 4 rounded chisel points soldered together.
These scissors would make the scalloping a sinch.