Project: Black Kurassier Metalhelm

Pontrest

Active member
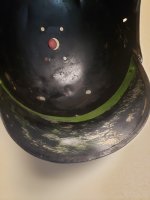
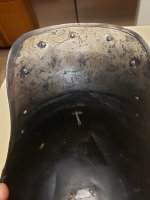
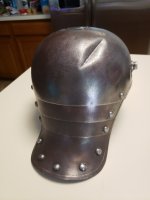
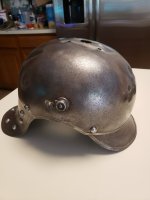
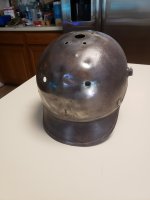
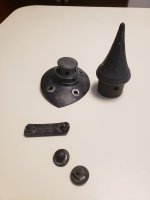
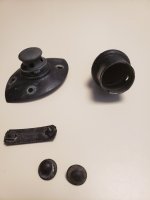
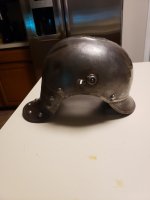
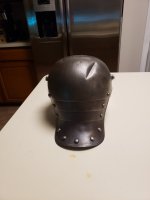
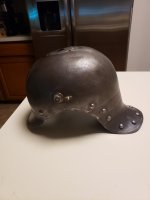
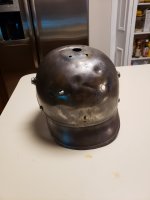
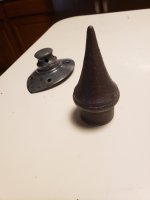
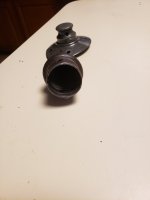
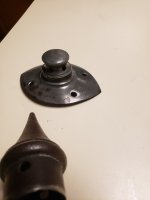
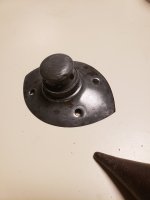
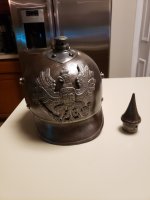
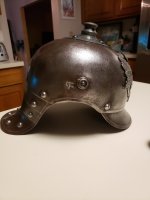
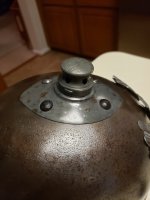
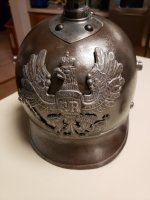
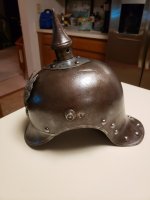
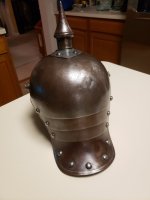
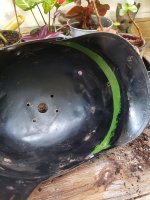
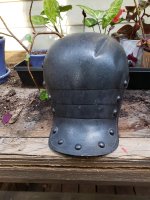
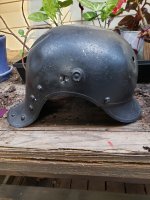
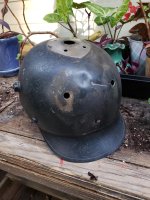
Attached are some current photos of my current active project: a Kurassier that has been painted black.
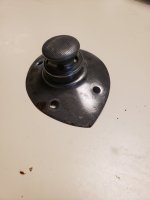
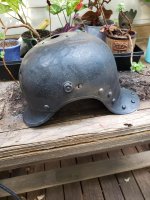
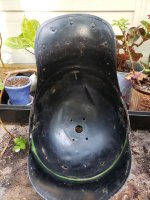
I started with a dremel, and transitioned to a power drill with a wire brush attachment, as the paint was persistent, and beneath it is a pretty thick coat of rust. I'm in the process of removing the rust now, and it's looking good, but will take some work. The spike and base were painted black as well. No eagle (wappen) came with this helmet, but I'm confident I can find a decent replacement. I'm still considering whether to lightly tap out the creases, or leave them as is.

More photos and updates to follow.....
 

Attachments

  • BK 1.jpg
    BK 1.jpg
    608.2 KB · Views: 29
  • BK 7.jpg
    BK 7.jpg
    390.2 KB · Views: 27
  • BK 6.jpg
    BK 6.jpg
    473 KB · Views: 26
  • BK 5.jpg
    BK 5.jpg
    502.4 KB · Views: 26
  • BK 4.jpg
    BK 4.jpg
    675.2 KB · Views: 27
  • BK 3.jpg
    BK 3.jpg
    535.1 KB · Views: 28
  • BK 2.jpg
    BK 2.jpg
    603.4 KB · Views: 29
Thank you! I have a kurassier helm with some comparable surface issues and will be interested in what you decide to do on this project. Please let us know what materials you use to restore it.
 
Here are the latest photos of this helmet. I've been using a Black & Decker cordless power drill with a wire brush attachment, and some decent pressure applied in order to get through the rust. Current progress represents about 2-3 hours of work. After this round, I applied some Autosol metal polish. Hopefully the polish will help break up some of the rust for the next session. I think it's starting to look good.
 

Attachments

  • 20230812_120946.jpg
    20230812_120946.jpg
    1.2 MB · Views: 15
  • 20230812_120939.jpg
    20230812_120939.jpg
    1.2 MB · Views: 14
  • 20230812_120928.jpg
    20230812_120928.jpg
    1.1 MB · Views: 13
  • 20230812_120921.jpg
    20230812_120921.jpg
    1.1 MB · Views: 14
  • 20230812_120913.jpg
    20230812_120913.jpg
    1.3 MB · Views: 15
  • 20230812_120904.jpg
    20230812_120904.jpg
    1,015.6 KB · Views: 15
Here's the spike, base, bolts, and tag. Manufacturer is CIE Cannstatt. I'm going to take care, as there may be original paint under the black paint.
 

Attachments

  • 20230812_125839.jpg
    20230812_125839.jpg
    918.4 KB · Views: 9
  • 20230812_125856.jpg
    20230812_125856.jpg
    973.1 KB · Views: 9
I once bought a M 17 helmet at a junk shop for 5 bucks it was painted silver and looked like something a biker would have worn back when. A friend told me to try something called zip strip its a paint remover.
I gently put a little on a piece of soft cloth and to my surprise it worked perfectly by just removing the silver spray paint. I'm not lying underneath was one of the best camo helmets I've ever seen.
Its certainly worth a shot.
John, I'll give that a try on the spike and base. Thanks for the tip!
 
Current status after about four or five hours of work with the rotary wire brush and Black & Decker cordless drill. The drill is reversible so one can go with or against the wire direction. This enhances its ability to cut through paint and rust.
 

Attachments

  • 20230813_200152.jpg
    20230813_200152.jpg
    881.5 KB · Views: 22
  • 20230813_200120.jpg
    20230813_200120.jpg
    848.4 KB · Views: 20
  • 20230813_200142.jpg
    20230813_200142.jpg
    951.7 KB · Views: 20
  • 20230813_200135.jpg
    20230813_200135.jpg
    960.3 KB · Views: 22
Terrific work. I would gently remove the dents as I strongly suspect they were caused by a kid playing war games and have nothing to do with its service life!
 
Terrific work. I would gently remove the dents as I strongly suspect they were caused by a kid playing war games and have nothing to do with its service life!
Pembroke, I was thinking the same. I'm going to get a nylon 2" hammer for the job. In the past, I've used auto body hammers, but I'm going to try the nylon hammer with a rounded end this time.
 
The nylon hammer is a very good idea but I would also try to find (borrow) a round 'dolly' former to go inside the skull while you gently work the hammer over the dents. These are normally used for taking dents out of car bodywork and not a problem to find. I once took the head of a ball pein hammer and set it upright in a vice to do much the same job - it supports the inside of the shell while you work the outside back down again.
 
I didn't think about the ball pein hammer head - good idea. I have used a railway spike head clamped into a vice. The slight curvature makes a good small dent anvil especially with the nylon hammer.
 
The nylon hammer is a very good idea but I would also try to find (borrow) a round 'dolly' former to go inside the skull while you gently work the hammer over the dents. These are normally used for taking dents out of car bodywork and not a problem to find. I once took the head of a ball pein hammer and set it upright in a vice to do much the same job - it supports the inside of the shell while you work the outside back down again.
I do have some auto body tools that I have used in the past, so I'll probably use them again for this project.
 
Update: I stripped the black paint off the spike and base. The base looks great, with about 85% original finish remaining. The spike is covered in a significant amount of rust, so I have more work ahead of me, but these pictures are where it currently stands.
 

Attachments

  • 20230906_181035.jpg
    20230906_181035.jpg
    1 MB · Views: 13
  • 20230906_181045.jpg
    20230906_181045.jpg
    738.2 KB · Views: 13
  • 20230906_181103.jpg
    20230906_181103.jpg
    650.8 KB · Views: 11
  • 20230906_181114.jpg
    20230906_181114.jpg
    767.1 KB · Views: 12
  • 20230906_181122.jpg
    20230906_181122.jpg
    917.6 KB · Views: 13
Update to this project. The great amount of rust covering this helmet and spike made for a difficult restoration. I used a rotating wire brush on my bidirectional cordless drill. I applied my favorite; Renaissance Wax, to the helmet and fittings. All that's left is removing the black paint and rust from the liner brads, and installation of them and the liner. I'm also working on some rough dug cockades which I'll paint and try to age.
 

Attachments

  • 20231023_204503.jpg
    20231023_204503.jpg
    1.1 MB · Views: 16
  • 20231023_204519.jpg
    20231023_204519.jpg
    1.1 MB · Views: 16
  • 20231023_204522.jpg
    20231023_204522.jpg
    871.9 KB · Views: 16
  • 20231023_204529.jpg
    20231023_204529.jpg
    1.3 MB · Views: 14
  • 20231023_204537.jpg
    20231023_204537.jpg
    1.3 MB · Views: 15
  • 20231023_204550.jpg
    20231023_204550.jpg
    1.1 MB · Views: 17
  • 20231023_204558.jpg
    20231023_204558.jpg
    1 MB · Views: 18
Back
Top