
Steve Nick
Well-known member
At Brian’s request I’m posting my progress on the helmet I’m currently restoring which was originally posted in the Latest Finding section. I posted it under the heading of Prussian Zahlmeister which later was proved to be inaccurate thanks to the input of Wojtek and Glenn.
Based on the information so helpfully provided by Glenn:
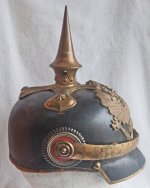
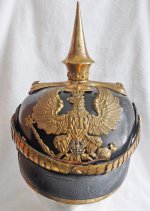
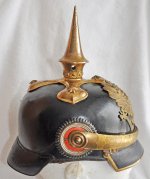
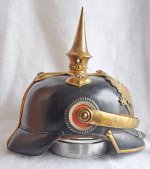
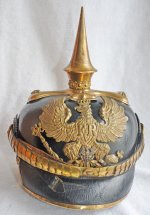
There were several branches of Army Administration that wore the Square peak "dragoon style" with Gold fittings, no scroll, FR, small silver eagle and domed chin scales. My understanding of Glenn’s post is that this helmet could have been worn by officials in the War Ministry, Provisions Offices, Garrison Administration, Clothing Offices, Hospital officials (including Doctors), and War Treasury field officials.
The small silver "Beamten-Adler" affixed to the Wappen was introduced in 1905. So, we know this helmet produced by Awes in Berlin (the cruciform base was Maker Marked) was made sometime post 1904.
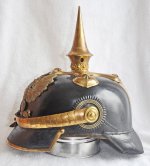
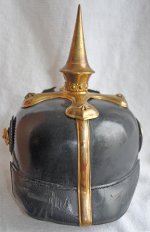
I was able to secure a replacement rear visor through “Our Fearless Leader” Brian, He warned me in advance that re-stitching on an officers’ helmet was a significantly more challenging effort than on an enlisted ranks helmet. There’s no substitute for experience and he was correct. Because officer helmets were privately produced there are differences in not only the quality of the parts but the quality of the workmanship differs.
This showed in the fineness of the stitching. The replacement visor had finer stitching with the needle holes being about 3/32’s of an inch on centre while the helmet shell had needle holes about 1/8 of an inch on centre. So, the holes didn’t line up exactly. This meant I had to skip a hole occasionally.
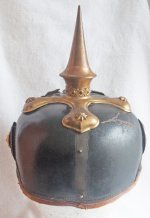
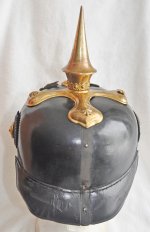
Getting the visor to align with the footprint of the missing rear spine to place the starting stitch proved frustrating to the point where I gave up and set the helmet aside to try another day a couple of times. I persevered and finally had to drill a new hole to get started using a very fine hand drill I made up.
With the rear visor now been installed the next step is finding a replacement rear spine. Brian and I will deal with that in the New Year.
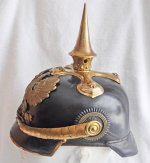
I also re-lacquered the two areas where there was bare leather showing due to flaking. That went much easier although the process is tedious.
I’m pleased with the progress to date. When the replacement rear spine is installed I think I’ll have a helmet that will be a positive addition to the collection.
Based on the information so helpfully provided by Glenn:
There were several branches of Army Administration that wore the Square peak "dragoon style" with Gold fittings, no scroll, FR, small silver eagle and domed chin scales. My understanding of Glenn’s post is that this helmet could have been worn by officials in the War Ministry, Provisions Offices, Garrison Administration, Clothing Offices, Hospital officials (including Doctors), and War Treasury field officials.
The small silver "Beamten-Adler" affixed to the Wappen was introduced in 1905. So, we know this helmet produced by Awes in Berlin (the cruciform base was Maker Marked) was made sometime post 1904.
I was able to secure a replacement rear visor through “Our Fearless Leader” Brian, He warned me in advance that re-stitching on an officers’ helmet was a significantly more challenging effort than on an enlisted ranks helmet. There’s no substitute for experience and he was correct. Because officer helmets were privately produced there are differences in not only the quality of the parts but the quality of the workmanship differs.
This showed in the fineness of the stitching. The replacement visor had finer stitching with the needle holes being about 3/32’s of an inch on centre while the helmet shell had needle holes about 1/8 of an inch on centre. So, the holes didn’t line up exactly. This meant I had to skip a hole occasionally.
Getting the visor to align with the footprint of the missing rear spine to place the starting stitch proved frustrating to the point where I gave up and set the helmet aside to try another day a couple of times. I persevered and finally had to drill a new hole to get started using a very fine hand drill I made up.
With the rear visor now been installed the next step is finding a replacement rear spine. Brian and I will deal with that in the New Year.
I also re-lacquered the two areas where there was bare leather showing due to flaking. That went much easier although the process is tedious.
I’m pleased with the progress to date. When the replacement rear spine is installed I think I’ll have a helmet that will be a positive addition to the collection.


")