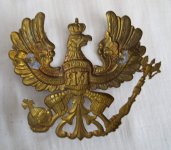
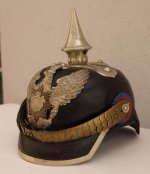
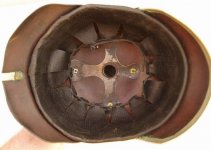
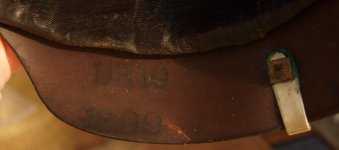
First attempt at a helmet restoration

Steve Nick

Well-known member
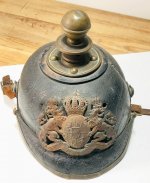
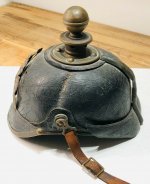
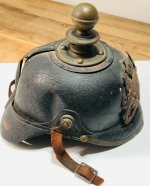
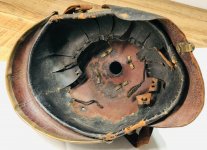
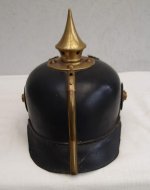
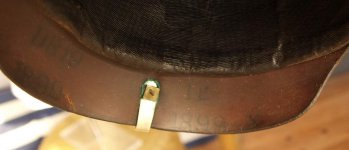
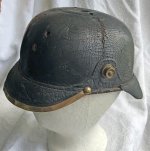
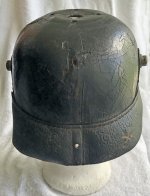
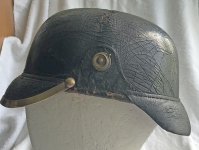
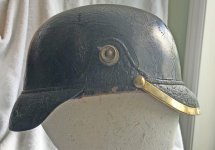
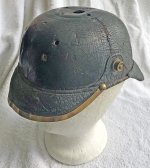
I recently bought this helmet from ebay as a trial piece. I figured it was going to be a chance to try my hand at re-stitching a visor, re-forming the rear visor, re-forming the shell to remove dents, repairing Wappen holes in the shell that shouldn’t be there, re-forming the rear spine and removing heavy oxidation from brass. It had enough problems that it would be a challenge while not being on the scale of installing a new liner.

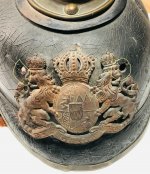
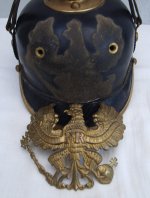
This is an NCO’s helmet, and therefore has no Kammer markings. It looked like the original Wappen hole spacing was meant for a Gardes Wappen, but that wasn’t the case. The spacing fits a Prussian Wappen which in my experience means a Baden or Wurttemburg Wappen will also fit.

It had a rusted Bavarian M15 Wappen which had been punched through the body of the shell by brute force, although most of the original leather is still attached and can be pushed back out and lacquered.

The rear visor was completely unstitched except for about a ½ inch at one end. It was also curled on one side.

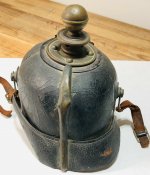
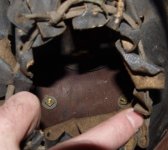
The spike mounting reinforcing plate was assembled on the outside of the shell. This happens a lot as we know.

The brass fittings were heavily oxidized, particularly the rear spine. It cleaned up better than I expected.

There are two significant dents in the shell that I’ll attempt to re-form.

The original chin strap is present but it’s in two pieces that will have to be glued back together.

Fortunately, I have a set of Prussian NCO’s M91 Kokarden that I can put to good use.

My big ‘ace in the hole” on this project is the fact that Brian has been very helpful and I’m drawing on his years of experience to guide me.

I’ll provide updates as things progress.
 

Attachments

  • Bavarian May 2022 1 Re-Sized.jpg
    Bavarian May 2022 1 Re-Sized.jpg
    318.1 KB · Views: 45
  • Bavarian May 2022 2 Re-Sized.jpg
    Bavarian May 2022 2 Re-Sized.jpg
    273.8 KB · Views: 42
  • Bavarian May 2022 3 Re-Sized.jpg
    Bavarian May 2022 3 Re-Sized.jpg
    314.8 KB · Views: 42
  • Bavarian May 2022 4 Re-Sized.jpg
    Bavarian May 2022 4 Re-Sized.jpg
    294.1 KB · Views: 48
  • Bavarian May 2022 5 Re-Sized.jpg
    Bavarian May 2022 5 Re-Sized.jpg
    345.9 KB · Views: 48
  • Bavarian May 2022 8 Re-Sized.jpg
    Bavarian May 2022 8 Re-Sized.jpg
    503.5 KB · Views: 50
Always glad to help out. 😊 one thing I really like about this helmet is that the rear spine (no slider vent) matches the kugel and confirms that this was originally an artillery helmet. I recently was looking at an M95 Garde OR’s helmet in my collection which I have owned for 30 years. It came with a repro spike which I replaced with an original proper removable Garde spike. It has sat in that format for decades but then I finally clued into the fact that there was No Vent on the spine! It’s M95 Garde Arty 😊 There are ink markings but they can’t be read. It now has the proper Garde Artillery kugel on it. I can’t believe how I failed to notice this before. Anyway Steve, this is a great project helmet to work on, have fun and post photos of your progress.
 
Hi Steve,
Nice project :) Really looking forward to your updates.

What makes this an NCO helmet? It's private purchase, but without the cockades how can you tell it's NCO?
Regards,
Lars
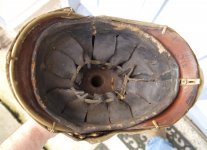
The Fancier square-cut liner, which is more comfortable than the regular enlisted leather liner.
 
I'm also looking forward to seeing the helmet come back to life. Thank you for sharing and good luck :)
 
Hi Steve,
Nice project :) Really looking forward to your updates.

What makes this an NCO helmet? It's private purchase, but without the cockades how can you tell it's NCO?
Regards,
Lars
Lars:

As Louis stated, the square cut tongues of the liner with the cross hatched finish on the leather were not used for Government issued helmets and indicates an NCO helmet coupled with the fact that there are no Depot markings indicating that it was a private purchase.
 
Thanks Louis and Steve,
I fully agree that this is a private purchase helmet, but as far as I know enlisted men and one-year volunteers were also allowed to use private purchase helmets when off-duty.
Regards,
Lars
 
Lars:

As Louis stated, the square cut tongues of the liner with the cross hatched finish on the leather were not used for Government issued helmets and indicates an NCO helmet coupled with the fact that there are no Depot markings indicating that it was a private purchase.
Further, according the prussian dress code the enlisted men liner should have only 9 tongues (Bekleidungsordnung Teil II für Mannschaften, von1896/1903, §39)
 
Lars:

As Louis stated, the square cut tongues of the liner with the cross hatched finish on the leather were not used for Government issued helmets and indicates an NCO helmet coupled with the fact that there are no Depot markings indicating that it was a private purchase.
I regret to say that I do not agree with that...

This old pattern of Eigentum liner with multi- squared tongues was replaced at some time (1880-1890) by the new silk liner. It´s an error to think that all the liners that still were on stock in the makers warehouses, were simply disposed as surplus trash...It´s exactly the same for the surplus M91 Wappen with screw and nuts that still were used in the grommets of the very first M95 productions.

During this transition period, those "out of fashion" but still confortable liners were simply sewn in some late M91 helmets or in some first M95 issued helmets that were bought by the units companies to dress the ranks of Unteroffizier and Sergeant. This was done in order to better distinguish these ranks with better uniforms from the ordinary troops. Soldiers at this rank (Unteroffizier and Sergeanten) had committed themselves for several years. Some of those "special" helmets are showing no regimental stamps, most of them are often showing only the company stamp (rarely BA or regiment stamps).

Such very old helmets with Garnitur III or more (years of production between 1891 and 1895) were kept in the Kompanie-Kammer and then re-issued at the 1914 mobilization to supernumerary recrutes in the active units (mostly reservists or Landwehrmänner I ban).

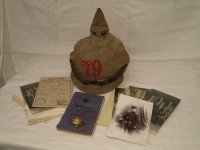
Here is a good example, a low Saxony barn find straight from the family of the wearer. The helmet has laid in a trunk with its Überzug and much documents and picts of the wearer. He was mobilized August 1914 as a Landwehrmann I ban in the JR79. He was wounded during the battle of the Marne and returned home for a long period of recuperation. His helmet remained on the family farm where it was only rediscovered more than 100 years later.

It´s a very first M95 helmet showing this "old fashion liner" and a M91 Wappen in M95 grommeted shell:

1.JPG
kap6.JPG
kap16.JPG

kap4.JPG
kap24.JPG
kap25.JPG
kap27.JPG

Philippe
;)
 
Last edited:
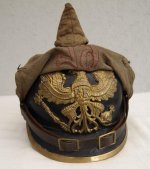
Another example worn in the Oldenburg DR19.
The wearer had the rank of a Wachtmeister at the end of his 12 years active duty (Senior Portepee Unteroffizier).
After his two regular years of duty, he decided to commit (Kapitulant) and was equipped with a better helmet. However, this helmet remains a regular Kammer issued helmet!
Here we have this old fashioned Eigentum liner again. This example has even been marked by the BA X (X), the unit (DR19) and the Eskadron Kammer (1E) and dated as well (1899).
old1.JPG
old17.JPG
old18.JPG
old20.JPG

Philippe
;)
 
Well, you learn something new every day! Thank you Philippe for expanding my knowledge of the manufacturing of pickelhaubes.
 
So, at this point I have re-stitched and re-formed the rear visor and removed the two serious dents in the shell.

I used a sewing needle with a larger than normal eye which I use to repair my goalie equipment. and used a pair of small pliers to grab the needle and pull it through. The old thread had to be removed hole by hole on the visor and the shell. I made myself a small hand drill to ream out the holes. This is a tedious process that I just plugged away at until I got bored and set it aside from time to time.

I borrowed some of my wife’s quilting pins to pin the visor into position. I managed to prick myself multiple times as working in the close confines of the interior of the shell doesn’t leave much room to maneuver. No banana fingers here!

After re-stitching the rear visor I moved on to the removal of the dents and the re-forming of the rear visor.

I created forming blocks from medium density foam that is somewhat rigid but has some compression ability. The re-forming has turned out quite well as both of the serious dents have been taken out. In the case of the most serious dent (photos 1, 3 and 5 ) the shape has been restored but the lacquer had already been damaged and will have to be replaced. The other dent (in photo 4) came out quite well. It was just behind the M91 post. The rear visor was re-formed using the wet paper towel technique and then placing a piece of the blocking foam bent double and wedged between the visor and the Styrofoam form. It looks just like new, at least in terms of its’ shape.

Next up is the filling of the two holes made in the shell by the knucklehead who thought pushing a Bavarian Wappen through the shell by brute force was a clever idea.

Then I’ll be mixing up some 1876 lacquer to patch the areas where the lacquer is missing and filling in major cracks due to crazing.

Anybody have experience in re-bending brass? One of the major challenges is going to be re-configuring the rear spine. As seen in the 'as rescued' photos, it's badly bent and when I re-formed it back into it's semi-tubular shape using a padded bench vise it's now a different radius which means it has to be re-shaped to a tighter radius while maintaining the semi-tubular shape. Hand bending doesn't seem to be possible. I'm thinking annealing may be the solution?

IMG_0099 Re-Sized.jpgIMG_0100  Re-Sized.jpgIMG_0102  Re-Sized.jpgIMG_0104  Re-Sized.jpgIMG_0105  Re-Sized.jpg
 
So, at this point I have re-stitched and re-formed the rear visor and removed the two serious dents in the shell.

I used a sewing needle with a larger than normal eye which I use to repair my goalie equipment. and used a pair of small pliers to grab the needle and pull it through. The old thread had to be removed hole by hole on the visor and the shell. I made myself a small hand drill to ream out the holes. This is a tedious process that I just plugged away at until I got bored and set it aside from time to time.

I borrowed some of my wife’s quilting pins to pin the visor into position. I managed to prick myself multiple times as working in the close confines of the interior of the shell doesn’t leave much room to maneuver. No banana fingers here!

After re-stitching the rear visor I moved on to the removal of the dents and the re-forming of the rear visor.

I created forming blocks from medium density foam that is somewhat rigid but has some compression ability. The re-forming has turned out quite well as both of the serious dents have been taken out. In the case of the most serious dent (photos 1, 3 and 5 ) the shape has been restored but the lacquer had already been damaged and will have to be replaced. The other dent (in photo 4) came out quite well. It was just behind the M91 post. The rear visor was re-formed using the wet paper towel technique and then placing a piece of the blocking foam bent double and wedged between the visor and the Styrofoam form. It looks just like new, at least in terms of its’ shape.

Next up is the filling of the two holes made in the shell by the knucklehead who thought pushing a Bavarian Wappen through the shell by brute force was a clever idea.

Then I’ll be mixing up some 1876 lacquer to patch the areas where the lacquer is missing and filling in major cracks due to crazing.

Anybody have experience in re-bending brass? One of the major challenges is going to be re-configuring the rear spine. As seen in the 'as rescued' photos, it's badly bent and when I re-formed it back into it's semi-tubular shape using a padded bench vise it's now a different radius which means it has to be re-shaped to a tighter radius while maintaining the semi-tubular shape. Hand bending doesn't seem to be possible. I'm thinking annealing may be the solution?

View attachment 23174View attachment 23175View attachment 23176View attachment 23177View attachment 23178
Wow. Amazing work. Brian would be proud.
 
It's coming along! Also, what kind of brute forces a wappen into the shell?! takes a lot of strength!
 
"what kind of brute forces a wappen into the shell?! takes a lot of strength!"
--A Gorilla with an eye for profit??
Steve, good solid job on the skull. Brass normally takes well to annealing (been there, done that) BUT 100 year old brass? Personally I would give it a go, with my heart in my mouth and a replacement already to hand. Looking forward to hearing of your choice of method for repairing the lacquer.
Whoever did it did it many years ago. They just pushed the loops through and used the end of the liner drawstring to tie the Wappen into the shell. Took me about 20 minutes to untie the knot and ended up losing about 4 inches of the drawstring.

I think annealing will be the last avenue if nothing else works.
 
I have annealed prongs to soften them up for rebending but have never tried to annaeal a spine in order to get it back into shape. This process is also going to melt all of the old solder. I would love to see before and after photos and a description of the process. Good luck Steve.
 
I've managed to acquire all the ingredients for the 1876 Lacquer recipe with the exception of the Mastic and the Sanadarac which I've ordered from ebay. While these two items are in transit I repaired the chin strap which was in two pieces using Tony's stacking and bevel cutting technique. Applying a thin bead of leather glue to each piece worked quite well and you'd be hard pressed to see where the bond is.

It's very apparent that the chin strap was originally finished in black on the outer surface. My inclination is to restore it but the leather is fragile. Maybe I should be thankful that it is back in one piece and just leave it alone?
 

Attachments

  • DSC_1590 Re-Sized.jpg
    DSC_1590 Re-Sized.jpg
    61.6 KB · Views: 25
Back
Top