
Steve Nick
Well-known member
I recently bought this helmet from ebay as a trial piece. I figured it was going to be a chance to try my hand at re-stitching a visor, re-forming the rear visor, re-forming the shell to remove dents, repairing Wappen holes in the shell that shouldn’t be there, re-forming the rear spine and removing heavy oxidation from brass. It had enough problems that it would be a challenge while not being on the scale of installing a new liner.
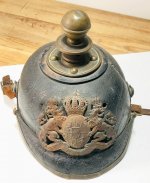
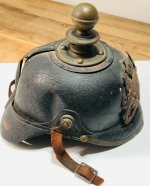
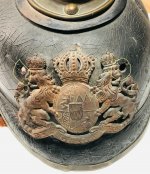
This is an NCO’s helmet, and therefore has no Kammer markings. It looked like the original Wappen hole spacing was meant for a Gardes Wappen, but that wasn’t the case. The spacing fits a Prussian Wappen which in my experience means a Baden or Wurttemburg Wappen will also fit.
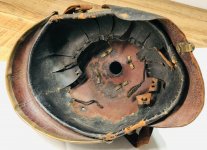
It had a rusted Bavarian M15 Wappen which had been punched through the body of the shell by brute force, although most of the original leather is still attached and can be pushed back out and lacquered.
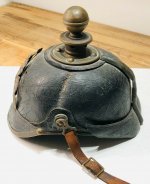
The rear visor was completely unstitched except for about a ½ inch at one end. It was also curled on one side.
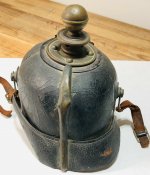
The spike mounting reinforcing plate was assembled on the outside of the shell. This happens a lot as we know.
The brass fittings were heavily oxidized, particularly the rear spine. It cleaned up better than I expected.
There are two significant dents in the shell that I’ll attempt to re-form.
The original chin strap is present but it’s in two pieces that will have to be glued back together.
Fortunately, I have a set of Prussian NCO’s M91 Kokarden that I can put to good use.
My big ‘ace in the hole” on this project is the fact that Brian has been very helpful and I’m drawing on his years of experience to guide me.
I’ll provide updates as things progress.
This is an NCO’s helmet, and therefore has no Kammer markings. It looked like the original Wappen hole spacing was meant for a Gardes Wappen, but that wasn’t the case. The spacing fits a Prussian Wappen which in my experience means a Baden or Wurttemburg Wappen will also fit.
It had a rusted Bavarian M15 Wappen which had been punched through the body of the shell by brute force, although most of the original leather is still attached and can be pushed back out and lacquered.
The rear visor was completely unstitched except for about a ½ inch at one end. It was also curled on one side.
The spike mounting reinforcing plate was assembled on the outside of the shell. This happens a lot as we know.
The brass fittings were heavily oxidized, particularly the rear spine. It cleaned up better than I expected.
There are two significant dents in the shell that I’ll attempt to re-form.
The original chin strap is present but it’s in two pieces that will have to be glued back together.
Fortunately, I have a set of Prussian NCO’s M91 Kokarden that I can put to good use.
My big ‘ace in the hole” on this project is the fact that Brian has been very helpful and I’m drawing on his years of experience to guide me.
I’ll provide updates as things progress.
Attachments
-
 Bavarian May 2022 1 Re-Sized.jpg318.1 KB · Views: 49
 -
 Bavarian May 2022 2 Re-Sized.jpg273.8 KB · Views: 47
 -
 Bavarian May 2022 3 Re-Sized.jpg314.8 KB · Views: 47
 -
 Bavarian May 2022 4 Re-Sized.jpg294.1 KB · Views: 54
 -
 Bavarian May 2022 5 Re-Sized.jpg345.9 KB · Views: 55
 -
 Bavarian May 2022 8 Re-Sized.jpg503.5 KB · Views: 56
") Really looking forward to your updates.
Really looking forward to your updates. one thing I really like about this helmet is that the rear spine (no slider vent) matches the kugel and confirms that this was originally an artillery helmet. I recently was looking at an M95 Garde OR’s helmet in my collection which I have owned for 30 years. It came with a repro spike which I replaced with an original proper removable Garde spike. It has sat in that format for decades but then I finally clued into the fact that there was No Vent on the spine! It’s M95 Garde Arty


")


")


