
You are using an out of date browser. It may not display this or other websites correctly.
You should upgrade or use an alternative browser.
You should upgrade or use an alternative browser.
Another JzP Metalhelm Comparison
- Thread starter SkipperJohn
- Start date
")
Pontrest
Active member
Thank you Lars. I'll keep everyone posted. Today it's supposed to get up to 50° Fahrenheit here, so I'll be able to get out and get some good work done.Very nice Pontrest,
Looking forward to how the restoration will progress
Regards,
Lars
USMC-EOD
Active member
Hi Pontrest.
I have actually worked on a couple of these to remove paint, address the tiny pitting and polish the shell exterior, and also fix a bent cuirassier spike back into being straight again like yours.
I will be happy to explain how I did it, if you are interested.
Bryan.
I have actually worked on a couple of these to remove paint, address the tiny pitting and polish the shell exterior, and also fix a bent cuirassier spike back into being straight again like yours.
I will be happy to explain how I did it, if you are interested.
Bryan.
Pontrest
Active member
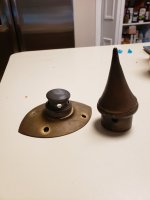
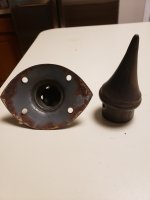
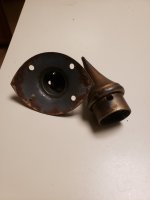
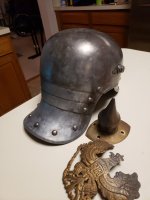
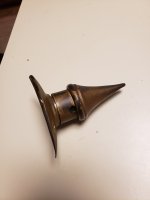
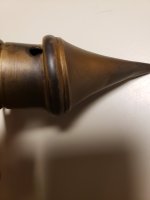
Bryan, I would absolutely like to know how you straightened your spike. I have attached close ups to detail how my spike is crushed on one side.Hi Pontrest.
I have actually worked on a couple of these to remove paint, address the tiny pitting and polish the shell exterior, and also fix a bent cuirassier spike back into being straight again like yours.
I will be happy to explain how I did it, if you are interested.
Bryan.
Attachments
-
 20221211_165803.jpg866.1 KB · Views: 9
 -
 20221211_165913.jpg922.4 KB · Views: 8
 -
 20221211_165927.jpg848.5 KB · Views: 9
 -
 20221211_170117.jpg1.2 MB · Views: 9
 -
 20221211_170133.jpg1.1 MB · Views: 10
 -
 20221211_170247.jpg855.9 KB · Views: 9
 -
 20221211_170258.jpg839 KB · Views: 8
 -
 20221211_170308.jpg911.2 KB · Views: 9
USMC-EOD
Active member
Sure!
My spike looked just like yours when it was bent.
So, what I did, was I found a short wooden dowel a little larger than the inner diameter than the inside of the spike, put a screw into the center of one end, wrapped the screw tightly with tape, and chucked it up on my power drill.
Then I put my zip-tied drill into my shop vice so it would run on it's own so i could use both of my hands, and i used rough sand paper to make the end of the dowel fit tightly into the open end of the spike. Basically ran a poor-man's lathe...
Then I used small pieces of scrap wood to support the spike in the jaws of my spike, and bent the neck of the spike back in the opposite direction of the bend until it was straight.
When I first did this, I was a little worried that it might bend the other side down into the same area, but the metal wants to basically go back into the same shape it was formed in. Mine went back into shape just fine.
The gold paint on your eagle, spike and base, and nuts should come off fine with acetone if the parts are originally parkerized. Acetone will not affect a parkerized finish, in my experience.
The light pitting on your outer shell can be eliminated if you buff it out with a buffing wheel and rouge. I used a soft orbital sander with fine grit paper on it to work on a helmet once first, and it knocked the fine light pitting back fairly nicely before buffing.
If you buff it, you will need to remove your liner, as the pins will catch on the cloth of the buffing wheel. If you can remove your M91 side posts, it will help as well with this process. The buffing wheel and rouge will remover original parkerizing finish if you don't remove them.
If the M91 posts are soldered on from the interior, then you will need to leave them on and just live with them getting shiny, unless you heavily tape them off.
It sounds like a scary and ugly process, and I was actually worried about doing this kind of thing the first time I attempted it.
But my metal working buddy Lu told me that doing this type of work on these types of helmets was really no different than what the old Regimental Armorors would be doing to repair damaged gear within a military unit during that time frame.
He said the old French heavy cavalry barracks in France all had big sand boxes behind the barracks so that cavalrymen could get the initial scrub on their iron and steel cuirasses and helmets and other equipment prior to final polishing.
And finally, he also told me that everyone loves to eat sausage, but nobody wants to actually see how it is made. He basically told me to stop being a pansy about it, and showed me how to "make the sausage" to get a couple of my metalhelme looking good again.
He was right! And I have been fixing my stuff when it needs it ever since.
That is why my hat is off to Brian, and the great work he is doing. It takes guts to work on other folks helmets with everything that could go wrong. I appreciate the pro-tips he drops here on the site so I can continue to fix my own stuff. And I'm grateful for a section on this site for pickelhaube restoration.
Good luck, and keep posting your results and findings!
Bryan.
Last edited by a moderator:
Pontrest
Active member
Bryan,Sure!
My spike looked just like yours when it was bent.
So, what I did, was I found a short wooden dowel a little larger than the inner diameter than the inside of the spike, put a screw into the center of one end, wrapped the screw tightly with tape, and chucked it up on my power drill.
Then I put my zip-tied drill into my shop vice so it would run on it's own so i could use both of my hands, and i used rough sand paper to make the end of the dowel fit tightly into the open end of the spike. Basically ran a poor-man's lathe...
Then I used small pieces of scrap wood to support the spike in the jaws of my spike, and bent the shift of the spike back in the opposite direction of the bend until it was straight.
When I first did this, I was a little worried that it might bend the other side down into the same area, but the metal wants to basically go back into the same shape it was formed in. Mine went back into shape just fine.
The gold paint on your eagle, spike and base, and nuts should come off fine with acetone if the parts are originally parkerized. Acetone will not affect a parkerized finish, in my experience.
The light pitting on your outer shell can be eliminated if you buff it out with a buffing wheel and rouge. I used a soft orbital sander with fine grit paper on it to work on a helmet once first, and it knocked the fine light pitting back fairly nicely before buffing.
If you buff it, you will need to remove your liner, as the pins will catch on the cloth of the buffing wheel. If you can remove your M91 side posts, it will help as well with this process. The buffing wheel and rouge will remover original parkerizing finish if you don't remove them.
If the M91 posts are soldered on from the interior, then you will need to leave them on and just live with them getting shiny, unless you heavily tape them off.
It sounds like a scary and ugly process, and I was actually worried about doing this kind of thing the first time I attempted it.
But my metal working buddy Lu told me that doing this type of work on these types of helmets was really no different than what the old Regimental Armorors would be doing to repair damaged gear within a military unit during that time frame.
He said the old French heavy cavalry barracks in France all had big sand boxes behind the barracks so that cavalrymen could get the initial scrub on their iron and steel cuirasses and helmets and other equipment prior to final polishing.
And finally, he also told me that everyone loves to eat sausage, but nobody wants to actually see how it is made. He basically told me to stop being a pansy about it, and showed me how to "make the sausage" to get a couple of my metalhelme looking good again.
He was right! And I have been fixing my stuff when it needs it ever since.
That is why my hat is off to Brian, and the great work he is doing. It takes guts to work on other folks helmets with everything that could go wrong. I appreciate the pro-tips he drops here on the site so I can continue to fix my own stuff. And I'm grateful for a section on this site for pickelhaube restoration.
Good luck, and keep posting your results and findings!
Bryan.
Thank you for this description of how you straightened your spike. I fully understand, and plan to execute everything up through making the dowel the proper shape for the inside of the spike. After that, I don't see how to brace the spike to use the dowel to straighten the spike. I suppose once I get the dowel in place, I can try to brace the spike somehow and bend it back into place. I'll have to think about that a little more.
I'll see about removing the paint on the spike, base, and wappen with acetone (fingernail polish remover should be able to work for this). As I have been removing the paint from the helmet, it shows a really nice patina, and I think I'll leave it as is, without buffing it out like I did on my other Kurassier helm. As with all my metal helmets, I'll finish off with a nice coat of Renaissance Wax to protect the finish and metal.
Thank you for your expertise and description of how you were able to straighten your spike. I'll keep you posted on mine.
Regards,
Tim
USMC-EOD
Active member
Hi.
Yeah; supporting the spike when I did this had me scratching my head as well for a couple of minutes.
I kind of jerry-rigged bits of scrap lumber cut-offs and also took some shop rags that I twisted tightly to pad the high central portion of my spike in a vice. Sorry; I did not take photos...
If I recall, I used my bench grinder and a rough dremel bits to shape some soft wood scraps to fit around the cone of the spike to make this work.
I think the most important thing is to isolate and support the actual spike while you do this, especially against the direction of the bend you will perform.
The only part needing bending is the straight-tube shaft of the bayonet-interlocking tube of the spike. The dowel you turn down doesn't need to have a point on it.
This is becoming quite the word-salad of descriptive instructions. I hope this makes sense.
Bryan.
Pontrest
Active member
Bryan, thank you for the clarification. I apologize for the misunderstanding on my part. I'll need a piece to fit in the cone of the spike to stabilize the spike while it is clamped using shaped pieces of wood and a vice, and a separate piece to fit into the straight tube shaft, in order to bend it back into place. This makes sense now. I'll see what I can come up with, and will take photos as I go.Hi.
Yeah; supporting the spike when I did this had me scratching my head as well for a couple of minutes.
I kind of jerry-rigged bits of scrap lumber cut-offs and also took some shop rags that I twisted tightly to pad the high central portion of my spike in a vice. Sorry; I did not take photos...
If I recall, I used my bench grinder and a rough dremel bits to shape some soft wood scraps to fit around the cone of the spike to make this work.
I think the most important thing is to isolate and support the actual spike while you do this, especially against the direction of the bend you will perform.
The only part needing bending is the straight-tube shaft of the bayonet-interlocking tube of the spike. The dowel you turn down doesn't need to have a point on it.
This is becoming quite the word-salad of descriptive instructions. I hope this makes sense.
Bryan.
Thank you again.
Regards,
Tim
Interesting discussion gentlemen and thanks for the compliment Bryan, it can be quite nerve wracking when working on someone else’s $3,500 generals helmet. I have straightened brass OR’s and officer spikes by simply putting the round base on a flat hard surface and applying pressure to get the spike back into proper vertical position. The cruciform base is a different animal and it is thinner and easier to apply pressure to the spike neck.
USMC-EOD
Active member
I know what you mean, Brian. Brass can be bent with a little bit of effort by hand.
But when I tried this with a steel cuirassier spike, it needed a little extra leverage, and I wanted to support the entire cylinder of the lower portion of the spike.
Honestly, when I did it, the outer support on the cone of the spike was only touching in a few places. The key seemed to be ensuring the leverage was applied to the correct spot.

Pontrest
Active member
I agree with Brian; that is a great diagram. I was discussing this with my uncle, and he was wondering if something solid shouldn't be put into the spike to ensure it keeps its form. I notice the "soft wood" between the sides of the steel vice and the spike. Is this like a pine vs. walnut soft, or a balsa wood soft?
USMC-EOD
Active member
I used some soft wood pine scraps, and allowed the wood to slightly "bite" into the high, wide point of the cone, above the tube being bent back into true. It helped to lock the whole thing in place before I began applying force.
I guess balsa wood would work pretty well for this.
Bryan
I guess balsa wood would work pretty well for this.
Bryan
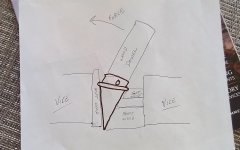
Pontiac9999
Well-known member
Very nice work. I used to work in a tool and die shop and it helped me think of creative ways to "adjust" bent stuff. I make my own jigs, fixtures and mandrels to assist in my restorations.Here is a drawing of what I did.