Baden Landwehr M95

b.loree

Administrator
Staff member
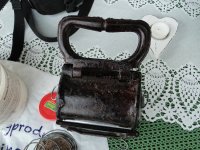
Another one of Alan's helmets which is an excellent piece with great markings. The only trouble here, is the top needs to be put back into the correct position.
IMG_4555.jpeg
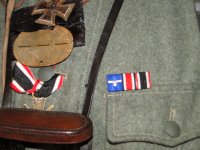
As is correct, no motto on the bandeau. These helmets are rare in my experience, this is the first one that I have vere had to hand.
IMG_4556.jpeg
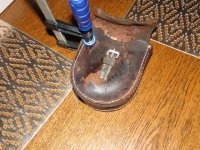
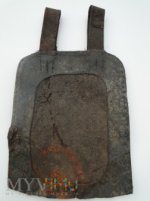
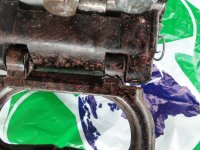
The sunken top becomes more obvious from a side view. The spike will be straightened. Note as well, how the shell shrinkage has buckled the brass spine which is typical. We often see this denting of the spine as the shell shrinks inward. It is also very common for this shrinkage to pop off the soldered spine brad. I first tried to bag this helmet and hydrate it but this did not solve the problem. The shell would not go back into position.
IMG_4570.jpeg
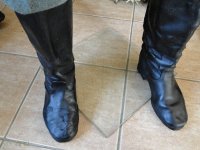
The leather of this helmet is of thick prewar quality.
IMG_4569.jpeg
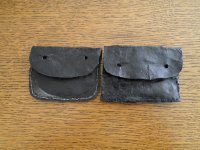
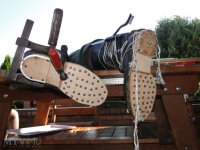
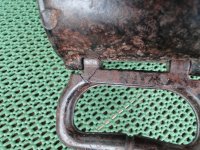
We have an excellent liner here!
IMG_4562.jpeg
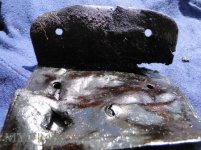
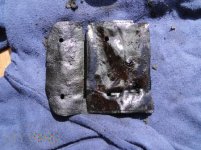
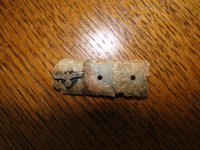
Excellent prewar markings: R114, 1908, IIB RIR III
 
Since the bag hydration method failed, I decided to immerse the entire top of the shell in water to soften it. I have done this in the past with disappointing results...the water causes the shellac finish to bleed into the interior of the shell which looks really bad. However, Wojtek uses vinegar and water in a 1:10 ratio and I had no choice but to try this. So in this case, 1L of warm water and 100ml of vinegar. Here is where we are at now:
IMG_4648.jpeg
Styrofoam head form, plastic bag and long elastics.
IMG_4649.jpeg
The top is now levelled but I am going to leave this 1 week to dry. The spine was removed, because it had bent to the old depressed shell. It will have to be straightened to fit the shell which is back in it's original shape.
 
I was very nervous about wetting the top of the shell because of my experiences years ago. I reached out to Wojtek and he assured me that his method worked with no problems so..... I tried it. How does anyone think of adding vinegar to the water???? :oops: It is great to have Kenny and Wojtek here with us. 👍
 
These small dents can also be repaired, but you need a second pair of hands and some experience. Krzysiek and I do it this way: I lightly moisten the small dent with water and vinegar and then push the skin out with my fingers from the bottom, and my helper dries the pickelhaube from above with an electric heater. You have to be especially careful not to melt the polish. We use the same method to make the object symmetrical.We make all inclined spikes using this method.Well done Brian, you did the job.
 
I was very nervous about wetting the top of the shell because of my experiences years ago. I reached out to Wojtek and he assured me that his method worked with no problems so..... I tried it. How does anyone think of adding vinegar to the water???? :oops: It is great to have Kenny and Wojtek here with us. 👍
Brian, we used to repair a lot of Wehrmacht leather recovered from the ground or swamp. All renovation methods were developed by trial. First, I started by softening the leather with lanolin dissolved in turpentine, and then we expanded our knowledge with old Polish books from 1900-1930. My old works in photos.
 

Attachments

  • DSC05498.JPG
    DSC05498.JPG
    116.8 KB · Views: 29
  • DSC05500.JPG
    DSC05500.JPG
    155 KB · Views: 28
  • DSC05601.JPG
    DSC05601.JPG
    3.2 MB · Views: 25
  • 93651623_m.jpg
    93651623_m.jpg
    67.8 KB · Views: 27
  • 93651723_m.jpg
    93651723_m.jpg
    72.7 KB · Views: 29
  • 93654523_m.jpg
    93654523_m.jpg
    56.2 KB · Views: 29
  • 93654723_m.jpg
    93654723_m.jpg
    19.9 KB · Views: 32
  • 93825223_l.jpg
    93825223_l.jpg
    156.2 KB · Views: 31
  • 93825323_l.jpg
    93825323_l.jpg
    218.1 KB · Views: 31
  • 93826023_l.jpg
    93826023_l.jpg
    86.7 KB · Views: 33
Hi Wojtek,
I don't want to capture the thread, but I really like how you have recovered these old leather battlefield finds into something useful.
I've only done that once, with the parts from at least two battlefield WW I German ammo pouches. The result (black pouch on top) looks nice, but has shrunk considerably (brown pouch on bottom for comparison).
Regards,
Lars

Patronentasche 09 Moys Vergleich.jpg
 
Hi Wojtek,
I don't want to capture the thread, but I really like how you have recovered these old leather battlefield finds into something useful.
I've only done that once, with the parts from at least two battlefield WW I German ammo pouches. The result (black pouch on top) looks nice, but has shrunk considerably (brown pouch on bottom for comparison).
Regards,
Lars

View attachment 45812
This happens very often, but there is a solution. Lars, you need to mix lanolin with turpentine and brush the inside several times. Then you need to put ammunition boats with shells inside. If you don't have ammunition boats, I can send it to you and you can get the shells yourself, because sending shell casings in Europe is treated almost like a terrorist attack.
 

Attachments

  • łódka.jpg
    łódka.jpg
    222.3 KB · Views: 12
  • 98613523_l.jpg
    98613523_l.jpg
    228 KB · Views: 12
Thank you for your kind offer Wojtek,
but even sending empty ammo clips is a sure way of getting unwanted police attention :)
I don’t mind that it’s shrunk, I have enough “unshrunk” ones.
Regards,
Lars
 
I repaired many wishes from World War II many years ago, but in 2018 the search was banned in my country and I no longer have the material for repairs.An interesting fact is that I bought the missing parts of the lamp, such as the shutter and the chain, from searchers in Stalingrad.
 

Attachments

  • 93745823_l.jpg
    93745823_l.jpg
    91.4 KB · Views: 15
  • DSC05038.JPG
    DSC05038.JPG
    3.1 MB · Views: 14
  • DSC05036.JPG
    DSC05036.JPG
    3.2 MB · Views: 14
  • DSC05034.JPG
    DSC05034.JPG
    3.2 MB · Views: 13
  • DSC05033.JPG
    DSC05033.JPG
    3.1 MB · Views: 14
  • 003.JPG
    003.JPG
    147.3 KB · Views: 15
  • 001.JPG
    001.JPG
    148.3 KB · Views: 15
  • 003.JPG
    003.JPG
    145.9 KB · Views: 15
  • 002.JPG
    002.JPG
    152.3 KB · Views: 16
Wojtek: I have not had much luck fixing dents in a helmet shell. I own a small Baden Dragoner that has this problem. I have wet it with water in the past but (no vinegar). I am going to try your water and vinegar on it and see if I can get the dents out. I solved the "extra pair of hands" problem by putting the hair dryer in a vice so that I could hold the helmet and dry out the dented area. :)
 
Thanks Brian for doing this work, and thanks to Wojtek for his excellent experience and advice that he shared. I appreciate it very much.

I took a gamble on this helmet since I did not know if the dent in the top of the helmet would have caused a crack or split in the leather, since I could not examine it in hand when I made the decision to purchase it. I love the markings in it. And as Brian has said, we rarely ever see these enlisted rank Baden Reservist or Landwehr helmets come up for sale. From my experience, I see more OR JR 94 and JR 95 helmets that come up for sale, compared to these Baden OR Landwehr helmets.

Thanks again gentlemen!

Best Wishes,

Alan


a Baden 114 Reservist Helmet 1 Front View.JPG

a Baden 114 Reservist Helmet 1.JPG

a Baden 114 Reservist Helmet 2.JPG
a Baden 114 Reservist Helmet 3.JPGa Baden 114 Reservist Helmet 7.JPG
a Baden 114 Reservist Helmet 6.JPG
 
After a week of drying, I took the helmet off the head form. Yahoo...no shellac seepage or bleed through!! In previous years, I have tried various types of water and all with the same result....a black shellac stain on the inside of the shell. My thanks to Wojtek for his vinegar and water solution to the problem. :) 👍
IMG_4654.jpeg
Alan, I will have the helmet reassembled and mailed back to you this week.
 
Cool!

Many thanks Brian for this excellent work you did. (y)

Many thanks to Wojtek for sharing his knowledge of the water & vinegar mixture to use. (y)

This is great news Brian! (y)

Best Wishes,

Alan
 
Unfortunately, I have been a bit premature in proclaiming restoration victory over this Baden helmet. It turns out, that I am not done quite yet. :) Patience and the ability to deal with challenges is all part of the haube restoration game! So, I started putting the helmet back together again today.....
IMG_4667.jpeg
No real surprise, the spike base does not match up with the top of the helmet now that it is close to its original position. If you look at the original pictures the spike neck was also bent backwards but that has been fixed.
IMG_4668.jpeg
IMG_4665.jpeg
Fortunately, I still have some of my repro stars with which to "lock down" the spike base. I am going to leave this in position for another week and see what this does. If there is no change (probably) I will wet the top again as is, with spike etc in position. I may even use a larger support disc to spread the pressure out along the top of the shell, thereby gaining a better fit. It is soooo much fun trying to restore other people's valuable property!! :oops::censored: 
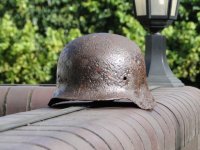
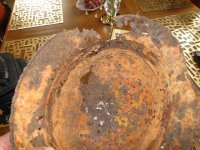
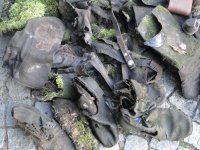
The stuff of nightmares but I have faced this situation before! Sorry Alan,.....a bit longer wait on this.
PS: Every bend in that visor trim is the result of 100+ years of shrinkage!
 
Many thanks Brian, I appreciate your excellent work on this helmet project!

From viewing the front of the helmet image, it looks like the upper front viewer's left side is still a bit "caved in". This helmet is likely much harder to work on restoring since the leather is the much thicker, older style. The viewer's left side brass grommet ring hole seems to be a bit caved in yet. Maybe my eyes are playing tricks on me with the photo. The top of the grommet ring seems to be leaning inward a bit, as compared to the right side grommet ring, when I look at the front view photograph.

It must have taken quite the damaging force to push in the top area of this helmet years ago before I acquired it. In the past I've had a thinner leather helmet body that was actually cracked because of a dent similar to this one here on the Baden helmet.

Thanks again Brian, I sure appreciate you taking on this project! You're a million times more patient and skilled than I would ever be in attempting this!

Best Wishes,

Alan
 
Back
Top