My first pickelhaube restoration

Drewwerks

Member
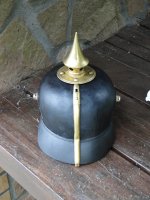
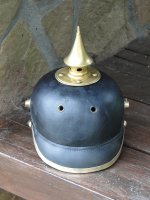
Here is my first Pickelhaube and my first attempt at a restoration (so please go gently with me).
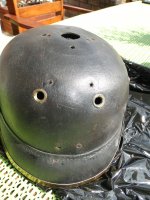
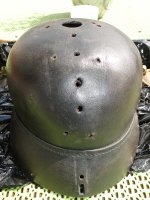
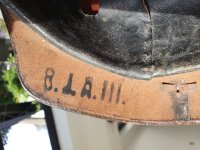
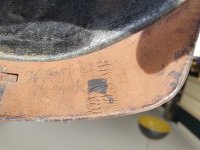
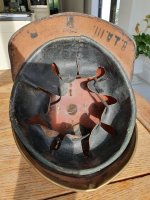
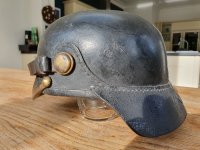
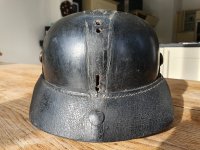
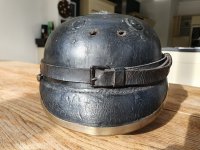
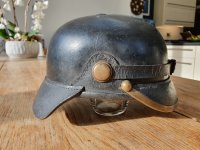
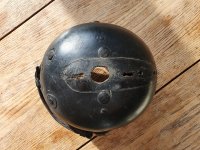
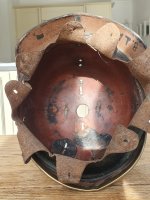
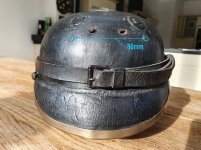
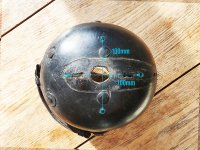
From what I can see so far it seems to have had three lives.

First life with small holes filled in (looks like in period) would suggest a cruciform spike base (you can just make out a faint indent in the leather of the cruciform shape). I’m thinking M1891 as there is no vent hole in the leather neck guard?

Second life converted to smaller standard spike base and higher/larger wappen holes.

Third life as a fireman’s helmet with ‘second life’ holes filled with painted rivets, clear indent where the protective plate was and a late fireman’s chin strap.

Of course I could be wrong so please correct me.
My initial thought is to try and take it back to the original M1891 spec.

All help and advice greatfully received.
Regards
Drew
 

Attachments

  • 20210923_161904.jpg
    20210923_161904.jpg
    4.3 MB · Views: 33
  • 20210923_161859.jpg
    20210923_161859.jpg
    4.1 MB · Views: 30
  • 20210923_161847.jpg
    20210923_161847.jpg
    2 MB · Views: 27
  • 20210923_161714.jpg
    20210923_161714.jpg
    2.9 MB · Views: 27
  • 20210923_161702.jpg
    20210923_161702.jpg
    3.7 MB · Views: 27
  • 20210923_161639.jpg
    20210923_161639.jpg
    3.2 MB · Views: 31
  • 20210923_161602.jpg
    20210923_161602.jpg
    2.8 MB · Views: 29
  • 20210923_161537.jpg
    20210923_161537.jpg
    3.7 MB · Views: 33
  • 20210923_163137.jpg
    20210923_163137.jpg
    1.5 MB · Views: 32
Go for it Drew. Despite needing a great deal of work I would definitely try to save this helmet if it were mine. Just above the BLA mark can I see a faint "IR" stamp?
Best wishes, Steve
 
You'll have a lot of fun Drew.
There's so many tips and advise here that comes from experience you can't go wrong.

I used a very fine automotive filler to fill in all the blemishes of the exterior, that's where I started.

Good luck and keep us updated as I enjoy seeing the before, during and after restoration.
 
I also noticed the faint Regimental stamp above BJA III stamp. BJA stands for bekleidung instantsetzung amt, the place were pickelhauben with problems were made acceptabel again for use in the army. Also the place were several holes were filled in, and it was later sent to another regiment.

Good luck with finding out more about the history of the helmet, but all you said about it is probably correct, about it being converted into a firemans helmet after the war.

Regards, Coert.
 
Good to see another member embarking upon the restoration experience! Many hauben were converted to fireman use after the war. Probably bought as war surplus, new fittings applied, old holes filled in and then sold off to local fire departments. We should remember that even before the war these manufacturers were also producing helmets for the fire services. All the repairs on this piece are period done, the patches the black steel plugs etc, I have seen before. This should be a fun project. :)
 
Thanks guys for your support.
Can anyone confirm my thought that this is an M1891 hauben?
I have measured the original holes to try and confirm what spike and wappen might have been on this helmet.
Re the 'IR' mark and a very faint hand written name has anyone had success using black light to try and highlight these details?
Thanks in advance for your thoughts.
Regards
Drew
 

Attachments

  • Pickelhaube dimensions front.jpg
    Pickelhaube dimensions front.jpg
    1.6 MB · Views: 17
  • Pickelhaube dimensions.jpg
    Pickelhaube dimensions.jpg
    2.2 MB · Views: 17
The circular stain on the inside top of the helmet produced by the tin support disc would suggest a cruciform spike base. These cruciform discs are larger than the more common circular ones. From the profile of the helmet, I would say this is an M95. You can see the original spine lines in the finish and holes in the helmet for the soldered prong and spine slider. The original spine screw hole in the rear visor has obviously been filled in.
 
Last edited:
The height of the front visor fitting in relation to the rear visor fitting looks like a model from 1891.I use leather from another donor to fill in the gaps.Regards
Wojtek
 

Attachments

  • DSC00520.JPG
    DSC00520.JPG
    1.4 MB · Views: 15
  • DSC00521.JPG
    DSC00521.JPG
    1.4 MB · Views: 16
  • DSC00534.JPG
    DSC00534.JPG
    1.4 MB · Views: 17
  • DSC00532.JPG
    DSC00532.JPG
    1.3 MB · Views: 17
Thanks Will
Here is a picture for you with my regiment marked 1918 Luger as I know you are a fan.with luger.jpg
 
Last edited:
Thanks for the comments.
Here are a few pictures with all the 'fireman' additions removed.
Wojtek: I also thought M1819 because there was no rectangular cut out vent hole in the rear neck guard.
Is there any way to work out what wappen would be correct for this helmet (the filled in holes are quite low down in position)?
Cheers
Drew20210925_103947.jpg20210925_104006.jpg20210925_104026.jpg20210925_104045.jpg20210925_104057.jpg
 
Last edited:
Thanks for the comments.
Here are a few pictures with all the 'fireman' additions removed.
Wojtek: I also thought M1819 because there was no rectangular cut out vent hole in the rear neck guard.
Is there any way to work out what wappen would be correct for this helmet (the filled in holes are quite low down in position)?
Cheers
Drew
I think the lowest skin-sealed holes were first. The middle ones were made for the fireman's emblem. You have to measure the distance between the holes. From what I remember, Tony has full wappens dimensions. https://www.pickelhaubes.com/xf/threads/zollbeamten-adler.15339/
 
Thanks Wojtec, that's a great link.
So I have been busy cleaning up the wartime wappen holes, I have used a very sharp punch to make leather patches from one of my wife's old leather belts (don't worry I asked her permission first).
They are 3.6mm thick the same as the haube, once glued in I am going to sand them back and then try a shellack coating.
The fireman badge holes had just been punched through so I could carefully push the original leather back into place.
Regards
Drew20210926_154031.jpg20210926_154148.jpg
 
Last edited:
I would suggest that you use a black felt tip marker to blacken in those patches before applying and shellac. The brown will show through the shellac without many coats. So solve the problem before hand.
 
Thanks Brian
I was going to use black leather dye but felt tip sounds easier.
I have some specialist leather glue, but what would you recommend?
Regards
Drew
 
I use a special leather glue as well available here on the other side of the Pond so I expect they are much the same. It is basically “contact cement “. I have also used Gorilla brand super glue which does list leather as things that it adheres to. I used the Gorilla on Amy’s crushed helmet because I needed something to solidify quickly while I held the broken top back in place. It worked well.
 
Thanks Brian
Here is the big question...
The front round visor seems original to the helmet, so when I looked at the spike table on Tony's great Kaiser Bunker site there only seems to be one unit that had a cruciform spike with a round visor... am I correct?
Hessen Mannschaften & Officer (Including Dragoons)Hessen Mannschaften & Officer (Including Dragoons)
 
Back
Top