GdC Restoration Project

skelts1974

New member
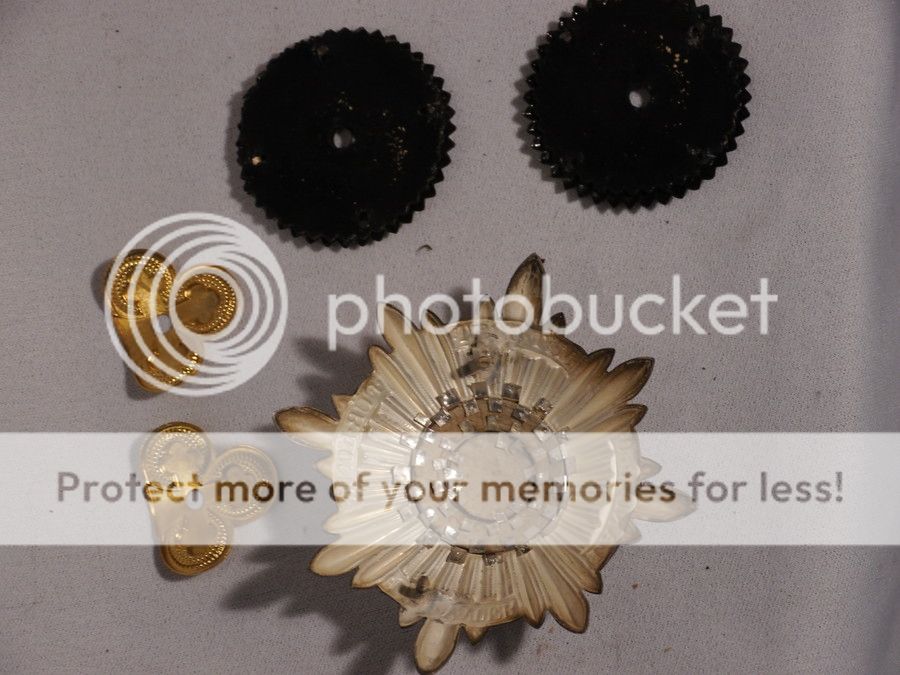
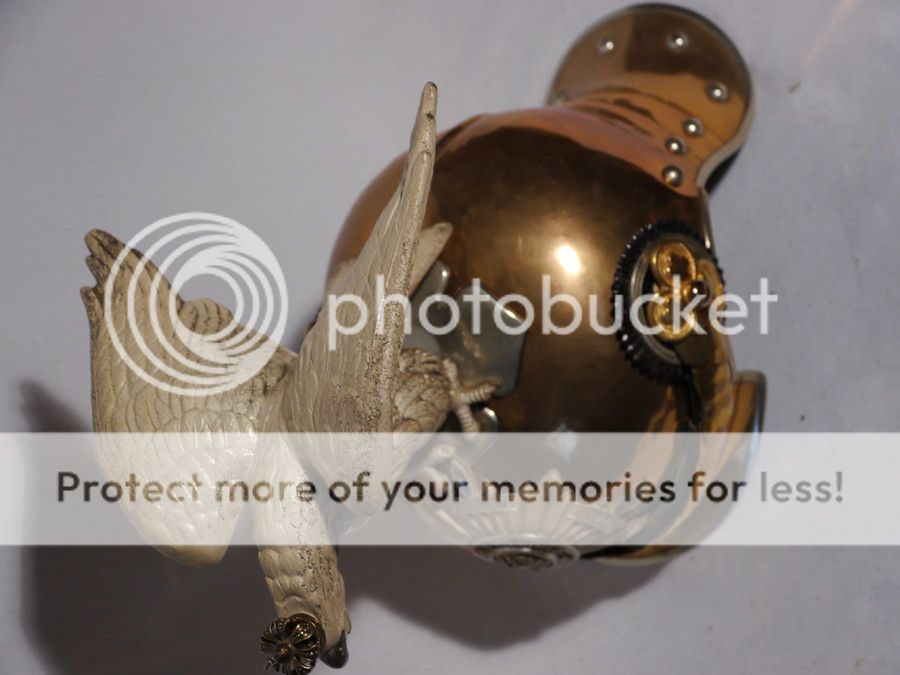
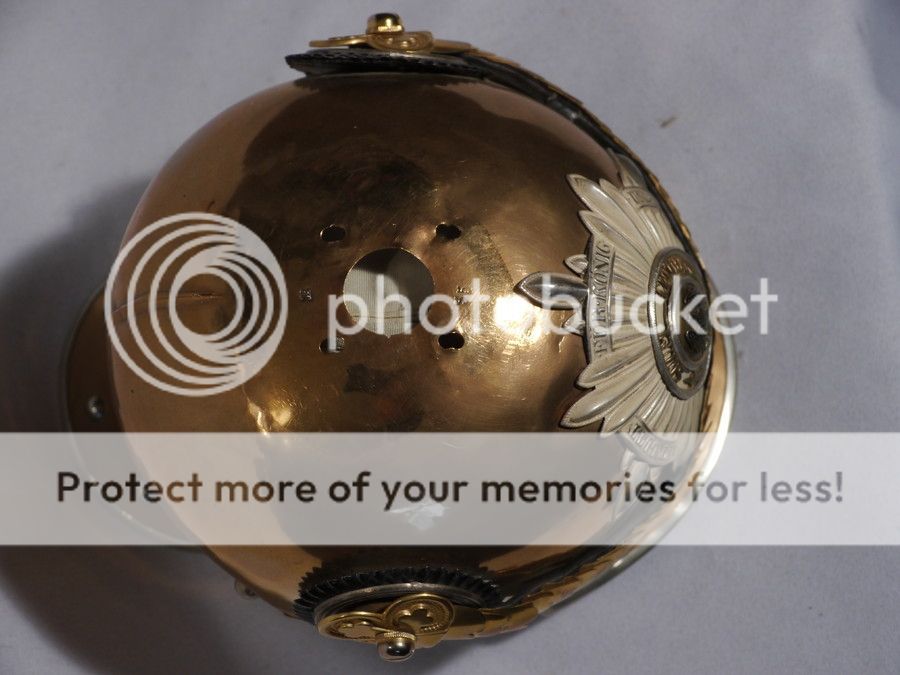
Hi everyone. This is the first time I have shared a find on this site. I recently completed purchasing all the parts needed for the restoration of my GdC Officer's Parade helmet and it is currently sitting in the workshop of Turner, Laughlin and Associates. I thought that I would share the restoration project here, starting with the helmet in its current state, then showing the completed item (a few weeks, months away yet). The journey began about six months ago when I spotted a helmet shell for sale on eBay from a seller who I have purchased a number of things from in the past. Seeing a once in a lifetime opportunity I snaffled the item up - much to the annoyance of my partner Helen. It is from there that the journey began.

While waiting for the shell to arrive I embarked on a quest to track down the required parts. I quickly brought a pair of officer kokardes from the UK (The seller had a pair of kokardes for a Saxon Garde helmet, I was after the National Kokardes only, but had to buy the pair as he was not prepared to split them). Unfortunately a week later I found the correct pair on a German Site and for a very reasonable price. I also picked up a set of trefoils and mounting screws / bolts from the same seller. Both purchases appear to have come from the same helmet. Interestingly, I had been told by an American dealer that he had not seen a matching pair of trefoils for sale in over twenty years of business. Guess he was not looking hard enough.

A few weeks later I identified a parade eagle in great condition. The German seller had a GdC helmet that had been restored in the past but had later been damaged and as a result was breaking it down to sell as a parts helmet. It took a few days to organise a deal where I obtained not only the eagle but also the GdC Officer's wrappen. By this time it was Christmas and Helen was more than a little annoyed at the amount of money I was spending (investing?!?) in this project. Apparently I loved the helmet more than her - words I am sure that others have heard in the past.

The original helmet shell had arrived by this time and I was fast putting the pieces together in my stash when the German seller who had sold me the Eagle and Wrappen offered up the accompanying helmet shell – a great example of a pattern 1907 Officer’s Parade helmet.

At this stage, having invested in all the other parts, I could not say no. The deal was struck and I started paying off a massive lay-buy debt (Helen by this stage was threatening murder, or at least maiming). During the final stages of the purchase I also scrounged up a second set of Trefoils (again from the same helmet – originals that have been re-plated).

Chin scales were a problem. While paying off the helmet shell several pairs of chin scales came on the market. Unfortunately I did not have the collateral to secure these. I had several pairs of Dragoon chin scales at home already. One set in good condition and the other covered with grime and missing parts. The solution was an easy one. Cameron from Turner, Laughlin and Associates recommended that we use my Dragoon sets to create the required chin scales for my GdC. A simple solution that has saved time and money. So win, win in my books.

With all parts assembled about a month ago I was just waiting for an opportunity to post the parts from Australia to America when I identified a silk liner and leather sweatband from a pickelhaube that would fit my helmet. Posting was delayed until I had secured the items (I was aiming for as close to possible a restoration using original period parts).

OK so here we go. Take a look at the photos and watch the restoration take shape.

Regards

Steve
 
Very cool thanks for posting...a helmet obviously worth restoring. I look forward to more pics showing the different stages of restoration.
 
Looking forward to see the results.
Could we see more of the Parade eagle ?
Thank you,
Francis
 
OK as requested. Here are the photos of der Adler. Cameron has taken a look at it and indicated that it appears to have been covered with enamel to whiten it - as you can see the enamel has worn off on the beak. There is also some conglomeration / dirt that has built up on the surface. This does come off with a bit of careful scrubbing, but I thought it best to leave intact for Cameron to see what magic he could weave. The original silvering does however, appear to be intact. The crown will need replating and there is some damage to the tetra-foil base where someone has gone a bit overboard when tightening the retaining bolt - resulting in bending.

The bolt and washer appear to be original.

View attachment 1

I have been looking at Eagles for a while and there appears to be several grades of quality / make. Some have exquisite detail, while others, like mine are less detailed. I would imagine this is the difference between private purchase and issued.

 
All,

I should add that I am looking for a GdC Officer's helmet spike if anyone should happen to have one for sale or know someone who does.

Cheers

Steve
 
Cool project and thanks for sharing. Its always nice if someone really takes the effort to restore a pickelhaube to its former glory. And yes, the comments of your partner sound familiar :D

Regards,

Edwin
 
Great project, but I'm not so sure about that plate- can you provide better pics front and back?
 
Aaron, sorry no more pictures of the star at the moment. I can however confirm that the plate is original. I have seen several fakes over the last few months and there are some obvious differences. I have taken it apart totally to look at it in detail.
 
Hi,

Just an update on the restoration project. Cameron has begun looking at der adler. Initial examination indicates that it was painted with a shellac based paint which is proving to be quite tough and he has had some difficulty removing it. Despite this he has indicated that about 99% of the original silvering remains. There are two options available to bring the eagle back to its original matt silver look:

1. Clean the adler back to its original silver then spray with a matt lacquer. This would apparently dull down the shine of the original silver finish and also help retard any future tarnishing. This would only achieve about 90% of the effect I am after and the lacquer would be susceptible to scratching, or
2. The second option is the more expensive one and involves a total re-plating to get the complete matt silver finish.

Despite the expense I am looking at taking the second option with the hope of getting the same matt silver look as per the attached photo of the kaiser. Note the matt finish to the eagle and to the wrappen.

 
Hello,

I think I have seen some parts before, also a German dealer was offering them. I include some pictures I got at that time to show how the finish of the original plate and the eagle are quite the same:


According to the dealer, this was the original finish. The helmet came from a museum in the former DDR. I could be mistaking, but it seems quite reasonable to think it actually IS the original finish. the more when you say the lacquer is based on shellack, the finish used for furniture, metalware etc; before the invention of the modern thinner in the 1950's and thus the beginning of modern varnish. If I were you I would not touch at all the eagle. Once removed, there is no return.

Johan
 
Johan,

Thanks for the information and the photos. Yes that is my eagle and shell. The seller indicated that he was selling it on behalf of a friend and that it had, at some time, been restored. This restoration was clearly evident on the chin scales - that looked brand new - and the trefoils that had been re-plated.

I purchased the eagle, helmet shell and trefoils off this helmet (you will note that I am using a different set of trefoils in the restoration). My helmet plate is from the same seller, but is not the one shown in your photos. He has, unfortunately, indicated that he has sold the helmet plate in the photos. The origin of my helmet plate is unknown, but the seller has stated that it is original and after cleaning I believe this to be the case. Of note the liner shown in your photos was not offered to me at the time of sale - I believe that this may have been used in another helmet or sold separately. I am not sure if this was original or a restoration.

Interesting that it was a museum piece from the DDR. Unfortunately the eagle is in the process of being cleaned / shellac removed before being sent for re-plating. But thanks for the information.

Cheers

Steve
 
Ok time for some more pictures of the restoration. The eagle is in the process of being stripped down and cleaned. This has revealed the original silver beneath the shellack paint. Cameron has indicated that it is in great condition with no polishing required (see the attached image - right wing of the eagle). I am still keen to get it re-silvered in order to get it back to its original matt silver colour, but I will see how Cameron goes with the rest of the cleaning and stripping.

View attachment 1
Another part of the project which is underway is the cleaning, reforming and gilding of the chin scales. Cameron has done an amazing job of stripping and polishing the chin scales - you may note from my original photos that one set of chin scales was in terrible condition. The attached photo shows the scales strung and ready for the gilding process - Cameron calls them the 'leaves on the vine'.

The paper tags are reminders for the platers about the processes to be used in the gilding. "Straight plate" means they don't have to do any buffing or polishing; "no pre-nickle" indicates that nickeling is not to be applied before gilding as it results in a higher gloss finish than the original finish; and "tired solution" means using a tank which will impart a reddish-hued gold.
Some of you have asked for better photos - please let me know if the attached are improvements over the last.


As the restoration continues I have started the debate with Helen as to where I will be allowed to display this treasure. I am sure this is something that we have all been through. Regardless what we say about ruling the roost or being the master of the castle, we all know that from time to time that may not be the case. We will see what happens, but I am sure I will in the end (really who am I kidding here?).
 
Hi everyone a few observations from the restoration.

Cameron has done some work on a number of eagles now and has made the following observations in relation to their manufscture. Each Adler is comprised of one dozen separate stampings. These pieces were then finished on their edges, drilled in two places on each edge (so eight holes in a rectangular piece), then wired together and brazed. The molten brazing rod's brass filled the fissures between the plates, and melted into the wire ties. The protruding wires and any excess brass from the brazing was then filed-off (file marks are often evident on finished eagles), but the twisted wires on the eagles' interiors remain--forever. After final finishing, the Adler was then electrolytically plated.

On the wings and tail are holes for the extraction of fluids remaining from the plating process. When stood on its wings and tail, all three of the eagle's low points were therefore drains. As an aside, there is reason to believe that, when in use, the eagle's plating was occasionally freshened up possibly by the regimental armourer.

Cameron has just started work on the helmet shell. Tannic acid from the leather in the chinn scales strap on one side has caused some discolouration to the tombak and future discolouration from the chin scales cannot be discounted. As a result Cameron is recommending the application of a coat of microcrystalline wax on all surfaces to retard patination. I am told that this layer is essentially invisible and reduces tarnishing over time while on display. While I am sure that some would argue against this I am inclined to look at any reasonable measure to keep the helmet looking great after the restoration is complete. Especially given the item will be living in tropical Queensland, Australia.
 
I don't think wax would hurt at all... it's easy to clean off and will indeed protect the finish. Some like the patinated look, but that's a personal preference. As long as the helmet is being carefully preserved, then all's well.

:D Ron
 
Hi,

It has been a while since I have provided an update to the restoration project. Since my last post Cameron has had the chin scales and eagles crown gold plated and der adler has come back from its own extensive re-plating process. There was some delay to the work on der adler as the plater had several attempts to achieve the result we were after - a matt silver finish. So here it is.
View attachment 1

Der Adler is now back in Cameron's workshop and he has begun work on the helmet shell. As you may have seen from the previous photos there was some damage to the sides of the helmet where the lobster tail joins the shell. There were also quite a few small, but noticeable dents all over the shell.

Discussions are also underway in relation to the helmet lining. I have asked Cameron to clean the linen liner to the best of his ability, but to avoid using new materials where possible. At this stage we are seeing if the original pickelhaube leather sweatband that I sourced will make the transition into the GdC shell without disintegrating. The project is now only weeks away from finishing and I am waiting on some more photos to add to the site.
 
Ok so time for another update. I have been asking Cameron and Chris for some photos of the work in process for a while. This project, if you hadn't noticed, has been kind of all consuming financially and emotionally for a while and I have been keen to understand the process of restoration as it progresses. So here are a few studio shots of Cameron working on my helmet shell. They show some of the work that he has been doing to tease out all the dings that have accumulated over the years.
View attachment 3 This shot shows Cameron easing out the dents with a polished iron pestle - note the finished Eagle with gold crown in the background - I got a kick out of that one!
View attachment 2 This shot shows Cameron pushing out, not hammering, the dents and dings.
View attachment 1 This shot shows the resetting of the juncture of the shell with the lobstertail. The anvil inside the helmet shell is a converted steel mill ball that provides the curved shape required. This process involves using a gentle hammering with a nylon-headed hammer. The final picture in this series shows the mill ball being used to assist in pushing out the dents by applying pressure on the top of the helmet.
View attachment 1
 
OK the final shots - I ran out of space to post them - show Cameron working on the base of the Eagle. There was some damage here where a pervious owner had applied too much pressure when tightening the retaining screw. This had bent the tetrafoil base and was also effecting the ability to tightly secure the eagle to the shell.
View attachment 1
The photos show the reshaping of the tetra foil base atop a sheffield anvil. Hardwood drifts and a jewellers hammer are used to reshape the base back into the original shape.

So as you can see the project is really taking shape. The eagle, crown and chin scales have been re-plated. The shell has been reshaped and a number of key issues rectified. The base has been reshaped and is ready to be used for mounting the eagle. I will keep you all posted as the project continues.
 
Nice shots, thanks for sharing! I work metal from time to time as well and enjoy seeing the care he's taking. Just a very few tools and a lot of care can work wonders for an old shell like this one. Give him my compliments and a thumbs up! I'd be interested to know what the gray material (a thin, stiff foam or similar??) is on his work table, when he's pressing out the dents.

:D Ron
 
Back
Top