
You are using an out of date browser. It may not display this or other websites correctly.
You should upgrade or use an alternative browser.
You should upgrade or use an alternative browser.
Tschapka Restoration
- Thread starter Naprawiacz
- Start date

Pontiac9999
Well-known member
Ok Brian, my bad. When I hear "sewing machine " I freak out..lolYou missed the key phrase Pontiac "a manual sewing machine". There are antique sewing machines which are turned by a hand crank & wheel. This would allow you to carefully stitch one hole at a time with the machine. You have complete control over it and you can guide the stitching needle through each hole. I have often thought of buying one of these myself but they are not cheap and you would have to make sure it was in good working order. The late George Birringer used to us an antique treadle machine to stitch his repro liners. If it chipped the shellac in a major way then it is of no use.
Naprawiacz
Well-known member
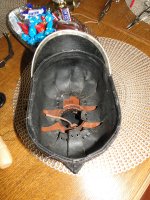
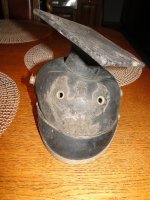
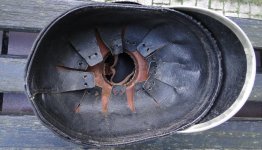
Hi Michiel!what a wonderful job, good idea to reshape the structure!, I did a similar job with a thschapka with sunk in top by putting it on a dummy head for a long time with good results as well, but are you going to replace the liner by a copy, or are you going to put back in the damaged one? I would prefer the original damaged one...
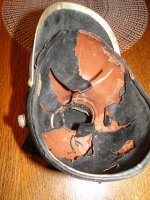
I do not use copies,because they are expensive and do not have the look.Tomorrow a colleague will bring me an original from another cap.What is left of the original is not reusable.
Attachments
Naprawiacz
Well-known member
2nd.Leibhusar
Well-known member
I bought that UR14 tschapka 28 april 2013 (Ciney military show), exactly remember the date because after the show I went rock climbing with daughter and friends in the Ardennes, and I fitted some ornaments to my climbing helmet for the occasion!
 looking great Michiel !!
Great job Wojtek, it looks very nice! I am surprised that you stitched the visor on first and then the liner ? I also see your “hand stitching machine” . I have one of those as well but I have never used it. I always thought the needle is too thick/large to stitch with. For those of you who don’t know, this device lets you stitch with only one pass across the stitch line, just like a real sewing machine. 

Naprawiacz
Well-known member
All the fault of haste.You are absolutely right about the order of work.As for the sewing machine, several thicknesses of leather needles are available in our country.International designation of needles: 70-0.7mm, 80-0.8mm, 90-0.9mm, 100-1mm, etc.When using a razor, the work is shortened by three timeGreat job Wojtek, it looks very nice! I am surprised that you stitched the visor on first and then the liner ? I also see your “hand stitching machine” . I have one of those as well but I have never used it. I always thought the needle is too thick/large to stitch with. For those of you who don’t know, this device lets you stitch with only one pass across the stitch line, just like a real sewing machine.
Naprawiacz
Well-known member
Naprawiacz
Well-known member
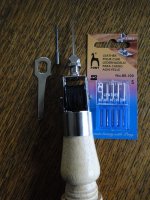
Steve I don't know the English name , but it looks like the picture.Is that "sewing machine" what they call a Webster punch? My wife has a few of those but I have never used one.
Steve
Wojtek
Attachments
seagull
Well-known member
Thanks for that Wojtek, it is constructed pretty much the same as a Webster Punch but they are used for a form of embroidery and the needle is hollow with the thread fed up through it to the point, whereas you are using a solid leather needle. The problem with a Webster needle is getting one thin enough to go through the holes in the leather but big enough to allow the waxed thread to go through. Interesting because the principle is the same - to put a loop through to the other side of the leather where the 'back' thread passes through and locks it all together.
I think I can modify one of my wife's Webster kits to do this - if she will will issue an AKO to authorise it!
Cheers, Steve
I think I can modify one of my wife's Webster kits to do this - if she will will issue an AKO to authorise it!
Cheers, Steve
Naprawiacz
Well-known member
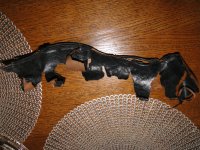
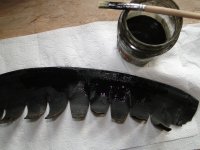
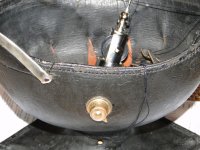
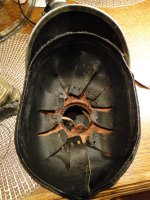
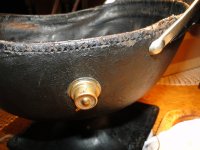
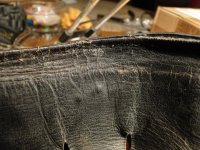
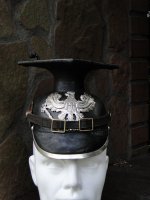
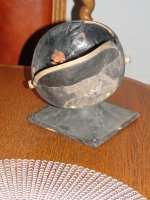
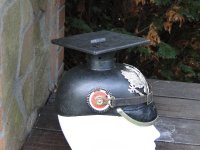
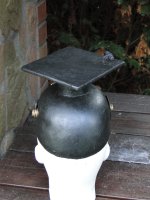
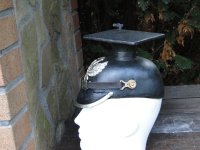
This is all I am able to do with it.This is the end of my capabilities.
Attachments

Pontiac9999
Well-known member
Wow! Excellent work! I knew all along this piece could be restored, and you did it perfectly!
Very nice
Very nice
Naprawiacz
Well-known member
Honestly, thanks to you I bought this item.I wanted to try if I can fix it.Wow! Excellent work! I knew all along this piece could be restored, and you did it perfectly!
Very nice
Naprawiacz
Well-known member
Coert thank you beautifully for your kind words.Greetings warmly.And you succeeded in a great way Wojtek!
What a great resurrection of a Tschapka that was regarded as lost by many. It has found a new life.
Regards, Coert.